Chocolate Cream Cheese Frosting


Amish Friendship Bread


 Serve warm or cool, slice and enjoy!
Pico de Gallo
This post was originally featured on KansasWomenBloggers.com
I LOVE cream cheese frosting! As I've mainly only made original cream cheese frosting, I wasn't sure how chocolate cream cheese frosting would be. And you know what? It was great! I originally found the recipe on Cupcake Project; a cute site that has tons of yummy ideas! Here's the recipe:
You'll need:
1 (8 ounce) block cream cheese, room temperature
1/4 cup (1/2 stick) butter, room temperature
3 cups powdered sugar
1/2 cup cocoa powder
Start by combining the cream cheese and butter in a large bowl. (I decided to be lazy and use the stand mixer!)
Then add the powdered sugar….
And mix together well!
Then add the cocoa powder.
Yum!!! This is where taste testing comes in!
Spread over your favorite cake and enjoy!
Ashleigh
Copy, Paste, and Print for the recipe below:
Chocolate Cream Cheese Frosting
(prairiegalcookin.blogspot.com)
I LOVE cream cheese frosting! As I've mainly only made original cream cheese frosting, I wasn't sure how chocolate cream cheese frosting would be. And you know what? It was great! I originally found the recipe on Cupcake Project; a cute site that has tons of yummy ideas! Here's the recipe:
You'll need:
1 (8 ounce) block cream cheese, room temperature
1/4 cup (1/2 stick) butter, room temperature
3 cups powdered sugar
1/2 cup cocoa powder
- Combine the cream cheese and butter in a large bowl.
- Carefully add in the powdered sugar.
- After the sugar is mixed in, add the cocoa and mix well.
- Spread on your favorite cake and enjoy!
Amish Friendship Bread
Amish Friendship bread is one of my favorite breads to make! We originally got this recipe years ago from a friend, made it a couple times, and then it got stuck in the back of the recipe box. So, awhile back, we pulled it out and made a batch of starter. The bread is sweet, much more like a dessert bread than a savory bread. When it's warm, you can spread a little butter on it and it's wonderful!
The reason behind the name Friendship bread is because every time you make it, you give away two bags of sourdough starter to your friends. So, every 10 days, you are blessing two people with a starter of their own! The only problem with this is that some of us are rather forgetful and don't get our starters given away... So we tend to have 30,000 loaves of bread to bake when the day to bake finally rolls around. For more info on this great catastrophe, please visit: One Little Mistake...
One thing about this bread is that it's a sourdough bread, as it sits for 10 days before baking. Every five days, you'll add some more flour, sugar, and milk, and then the rest of the time you'll just mix it well. Simple, but it can be rather hard to wait 10 days before you get your fresh batch of bread.
The starter is quite simple, only the same three ingredients you add to the bread throughout the 10 days. One problem I've had with some recipes like this is that they tell you how to feed the starter and then how to bake it, but they don't tell you how to make the sourdough starter; so that's one thing I will tell you how to do!
Day 1 - Make the starter by combining 1 cup milk, 1 cup flour, and 1 cup sugar in a gallon size zip-lock bag.
Day 2 - Knead the bag and let out any air in it.
Day 3 - Knead the bag and let out any air in it.
Day 4 - Knead the bag and let out any air in it.
Day 5 - Add to the bag, 1 cup milk, 1 cup flour, and 1 cup sugar. Knead the bag and let out any air in it.
Day 6 - Knead the bag and let out any air in it.
Day 7 - Knead the bag and let out any air in it.
Day 8 - Knead the bag and let out any air in it.
Day 9 - Knead the bag and let out any air in it.
Day 10 - Start by adding 1 cup milk, 1 cup flour, and 1 cup sugar. Then, place one cup of starter each into three separate gallon sized bags. You'll want to keep one as your own starter and then give the other two away. After this, pour the remaining starter in a bowl and follow the instructions below.
For the remaining starter (around 2 cups) you'll need:
1 cup butter, melted (you can also use oil, I just prefer butter as it tastes better)
1/2 cup milk
3 eggs
1 t. vanilla
2 cups flour
1 cup sugar
1 1/2 t. baking powder
2 t. cinnamon
1/2 t. baking soda
1/2 t. salt
1 (5.1 ounce) box vanilla pudding
Okay, so you've made your starter. You combined the 1 cup milk, 1 cup flour, and 1 cup sugar in a zip-lock bag. Now, it's day five. Open your bag, and into it pour the 1 cup sugar....
The 1 cup flour....
And the 1 cup milk...
Combine these together and then knead everyday until you reach day 10. Then, you'll want to do this whole process again (adding the milk, flour and sugar).
On day 10, after adding the three ingredients, pour one cup of starter each into three separate gallon sized bags. Keep one for yourself and give the other two away.
Now, pour the remaining starter into a bowl and add to it the butter (or oil), milk, eggs, and vanilla.
Set aside.
In another large bowl, combine the flour...
The sugar...
And then the baking powder, cinnamon, baking soda, salt, and vanilla pudding mix.
Mix this up really well...
And then combine with the liquid mixture in the other bowl.
Go grab two loaf pans and spray the bottoms and sides with non-stick cooking spray.
Here's the neat part! Grab the cinnamon-sugar container and sprinkle it all around in the loaf pan. Cover it completely!
Divide the batter between the two pans and then bake at 325* for 1 hour (or until a toothpick inserted into the center of them comes out clean.)
Ashleigh
Amish Friendship Bread
(prairiegalcookin.blogspot.com)
Amish Friendship bread is one of my favorite breads to make! We originally got this recipe years ago from a friend, made it a couple times, and then it got stuck in the back of the recipe box. So, awhile back, we pulled it out and made a batch of starter. The bread is sweet, much more like a dessert bread than a savory bread. When it's warm, you can spread a little butter on it and it's wonderful!
The reason behind the name Friendship bread is because every time you make it, you give away two bags of sourdough starter to your friends. So, every 10 days, you are blessing two people with a starter of their own! The only problem with this is that some of us are rather forgetful and don't get our starters given away... So we tend to have 30,000 loaves of bread to bake when the day to bake finally rolls around. For more info on this great catastrophe, please visit: One Little Mistake...
One thing about this bread is that it's a sourdough bread, as it sits for 10 days before baking. Every five days, you'll add some more flour, sugar, and milk, and then the rest of the time you'll just mix it well. Simple, but it can be rather hard to wait 10 days before you get your fresh batch of bread.
The starter is quite simple, only the same three ingredients you add to the bread throughout the 10 days. One problem I've had with some recipes like this is that they tell you how to feed the starter and then how to bake it, but they don't tell you how to make the sourdough starter; so that's one thing I will tell you how to do!
Day 1 - Make the starter by combining 1 cup milk, 1 cup flour, and 1 cup sugar in a gallon size zip-lock bag.
Day 2 - Knead the bag and let out any air in it.
Day 3 - Knead the bag and let out any air in it.
Day 4 - Knead the bag and let out any air in it.
Day 5 - Add to the bag, 1 cup milk, 1 cup flour, and 1 cup sugar. Knead the bag and let out any air in it.
Day 6 - Knead the bag and let out any air in it.
Day 7 - Knead the bag and let out any air in it.
Day 8 - Knead the bag and let out any air in it.
Day 9 - Knead the bag and let out any air in it.
Day 10 - Start by adding 1 cup milk, 1 cup flour, and 1 cup sugar. Then, place one cup of starter each into three separate gallon sized bags. You'll want to keep one as your own starter and then give the other two away. After this, pour the remaining starter in a bowl and follow the instructions below.
For the remaining starter (around 2 cups) you'll need:
1 cup butter, melted (you can also use oil, I just prefer butter as it tastes better)
1/2 cup milk
3 eggs
1 t. vanilla
2 cups flour
1 cup sugar
1 1/2 t. baking powder
2 t. cinnamon
1/2 t. baking soda
1/2 t. salt
1 (5.1 ounce) box vanilla pudding
- Okay, so you've made your starter. You combined the 1 cup milk, 1 cup flour, and 1 cup sugar in a zip-lock bag. Now, it's day five. Open your bag, and into it pour the 1 cup sugar, 1 cup flour, and 1 cup milk.
- Combine these together and then knead everyday until you reach day 10. Then, you'll want to do this whole process again (adding the milk, flour and sugar).
- On day 10, after adding the three ingredients, pour one cup of starter each into three separate gallon sized bags. Keep one for yourself and give the other two away.
- Now, pour the remaining starter into a bowl and add to it the butter (or oil), milk, eggs, and vanilla. Set aside.
- In another large bowl, combine the flour, sugar, baking, powder, cinnamon, baking soda, salt, and vanilla pudding mix.
- Mix this well and then combine with the liquid mixture.
- Go grab two loaf pans and spray the bottoms and sides with non-stick cooking spray. Sprinkle cinnamon-sugar all over the bottom and sides of the loaf pan.
- Divide the batter between the two pans and then bake at 325* for 1 hour (or until a toothpick inserted into the center of them comes out clean.)
- Slice and serve cooled or warm. (Wait ten minutes before slicing or removing bread from pan.)
Enjoy!
Pico de Gallo
This post was originally featured on KansasWomenBloggers.com
 With Memorial Weekend almost here, who isn’t looking for a fun recipe to whip up and feed the crew? What makes this recipe even better is that you can make it “lakeside-style”.
Simply put, Pico de Gallo is easy and quick enough that you can make it with just a few fresh veggies, a knife, and a bowl. Pico de Gallo is basically an uncooked Mexican style salad full of tomatoes, onions, peppers, and cilantro.
Don’t let it sit for hours in the refrigerator or it will just get gooey and gross; make it right before serving so it’s fresh, crisp, and bursting with summer flavor!
You'll need:
5 firm Roma tomatoes
1/4 of a large red onion
1 Jalapeño pepper
1/2 cup Cilantro
1/2 a lime
Salt
Freshly cracked black pepper

Start by washing the tomatoes, cilantro, lime, and pepper.

Then, finely dice the tomatoes, onion, jalapeño, and cilantro. Place in a bowl. Squeeze the lime juice over the diced veggies. Add a little freshly cracked pepper and a dash of salt. (You'll want to adjust the amount of salt according to how salty you like it and how salty your chips are.) Stir together and serve right away!
Variations -
- You can change the amounts of veggies to fit your personal likes and dislikes. Make it yours!
- Add some Pico de Gallo to raw beef burgers before grilling to give the burgers some extra juice and a little pop!
Enjoy!
Ashleigh
Copy, Paste, and Print for the recipe below:
Pico de Gallo
(prairiegalcookin.blogspot.com)
With Memorial Weekend almost here, who isn’t looking for a fun recipe to whip up and feed the crew? What makes this recipe even better is that you can make it “lakeside-style”.
Simply put, Pico de Gallo is easy and quick enough that you can make it with just a few fresh veggies, a knife, and a bowl. Pico de Gallo is basically a uncooked Mexican style salad full of tomatoes, onion, peppers, and cilantro.
Don’t let it sit for hours in the refrigerator or it will just get gooey and gross; make it right before serving so it’s fresh, crisp, and bursting with summer flavor! Sounds good to me. Let’s get started!
You'll need:
5 firm Roma tomatoes
1/4 of a large red onion
1 Jalapeño pepper
1/2 cup Cilantro
1/2 a lime
Salt
Freshly cracked black pepper
- To start, gently wash the tomatoes, pepper, lime, and cilantro under cool water.
- Then, finely dice the tomatoes, onion, jalapeño, and cilantro. Place in a bowl.
- Squeeze out the lime juice over the diced veggies.
- Add some freshly cracked pepper and a dash of salt. (You’ll want to adjust the amount of salt you add according to how salty you like it and how salty your chips are.)
- Stir all of the ingredients together gently and serve right away!
Variations -
-You can change the amounts of veggies to fit your personal likes and dislikes. Make it yours!
- Add some Pico de Gallo to raw beef burgers before grilling to give the burgers some extra juice and a little pop!
Enjoy!
Peanut Butter Chocolate Chip Oatmeal Cookies

Mmm… These cookies are amazing! They rank up there close to my very favorite cookie ever. No joke. They're crisp on the outer edges, but still soft and chewy on the inside; the peanut butter flavor is subtle, not overwhelming as too many cookies tend to be, while the oatmeal adds a bit of texture. Trust me, you'll be glad you tried them!
1 cup butter, melted
1 cup sugar
2/3 cup packed brown sugar
1 cup peanut butter
2 eggs
2 t. vanilla
2 cups flour
1 cup oatmeal (It really doesn't matter if you use old-fashioned or quick oats; I just like old-fashioned!)
2 t. baking soda
1/2 t. salt
1 (24 ounce) bag chocolate chips (I use semi-sweet.)

Start by combining the sugars in a large bowl.

Melt the butter.

And add it to the sugars. Mix well!

Stir in the peanut butter…

Eggs…

And vanilla. Mix this all together well!


In a separate bowl, stir together the flour, oatmeal, baking soda, and salt.

Once it's all mixed, add it to the wet mixture.

Stir in the chocolate chips.


Drop cookie balls onto an ungreased cookie sheet.

Grab a glass and flatten the cookies until they're 2/3 of an inch thick. Bake at 350* for 8 - 12 minutes. Watch them closely, you want them golden brown and a little too soft in the center. Pull them out and let sit on the cookie sheet for a few minutes to finish cooking in the center.

Enjoy!
Ashleigh
Copy, Paste, and Print for the recipe below:
Peanut Butter Chocolate Chip Oatmeal Cookies
(prairiegalcookin.blogspot.com)
Mmm… These cookies are amazing! They rank up there close to my very favorite cookie ever. No joke. They're crisp on the outer edges, but still soft and chewy on the inside; the peanut butter flavor is subtle, not overwhelming as too many cookies tend to be, while the oatmeal adds a bit of texture. Trust me, you'll be glad you tried them!
1 cup butter, melted
1 cup sugar
2/3 cup packed brown sugar
1 cup peanut butter
2 eggs
2 t. vanilla
2 cups flour
1 cup oatmeal (It really doesn't matter if you use old-fashioned or quick oats; I just like old-fashioned!)
2 t. baking soda
1/2 t. salt
1 (24 ounce) bag chocolate chips (I use semi-sweet.)
- Preheat the oven to 350*
- In a large bowl, combine the sugars and butter.
- Once it's well mixed, stir in the peanut butter, egg, and vanilla. Mix really well!
- In another bowl, combine the flour, oatmeal, baking soda, and salt.
- Combine the wet and dry mixtures and then stir in the chocolate chips.
- Place balls of cookie dough on an ungreased cookie sheet and use a glass to flatten until they're around 2/3 inch thick.
- Bake for 8 - 12 minutes or until the edges are golden. You'll want the centers to be gooey still. Just pull them out and let the cookies sit on the pan for a few minutes afterwards to finish cooking in the center.
Enjoy!
Beef Enchiladas

Thursday night, everybody was outside working… Working up an appetite that is! It seems to keep getting harder to find something that EVERYBODY loves, but this turned out to be one of those meals! (I was so excited!) I started with three recipes, didn't really like any of them, and went on to make my own creation. Our family loves it, maybe yours will too!
You'll need:
1 lb. ground beef
1/2 lg. onion
1 clove garlic
1/4 t. taco seasoning (a heaping 1/4 teaspoon!)
1/2 (10 ounce) can Rotel Original
2 (10 ounce) cans mild enchilada sauce
2 cups mozzarella cheese, shredded
2 cups cheddar cheese, shredded
6 flour tortillas

Start by browning the beef, garlic, and onion together.

Once the meat is cooked, dump in the Rotel.

And the taco seasoning.

Stir it together and set aside.

In a large roaster pan, pour a little bit of the enchilada sauce and spread it around.

Grab a tortilla and spoon a little sauce in the center.

Place a nice heaping pile of the beef mixture on top of the sauce.

Add some cheese (of both kinds), wrap together and place into the pan.

Continue this until all of the tortillas and meat is used.

Pour a little more of the enchilada sauce over the tortilla bundles and then top with plenty of cheese.

Bake at 350* for 30 minutes.

Serve with hot buttered corn.
Enjoy!
Ashleigh
Beef Enchiladas
(prairiegalcookin.blogspot.com)
Thursday night, everybody was outside working… Working up an appetite that is! It seems to keep getting harder to find something that EVERYBODY loves, but this turned out to be one of those meals! (I was so excited!) I started with three recipes, didn't really like any of them, and went on to make my own creation. Our family loves it, maybe yours will too!
You'll need:
1 lb. ground beef
1/2 lg. onion
1 clove garlic
1/4 t. taco seasoning (a heaping 1/4 teaspoon!)
1/2 (10 ounce) can Rotel Original
2 (10 ounce) cans mild enchilada sauce
2 cups mozzarella cheese, shredded
2 cups cheddar cheese, shredded
6 flour tortillas
- Preheat oven to 350*
- Brown the meat, garlic, and onion.
- Once the meat is cooked, dump in the Rotel and the taco seasoning. Stir and set aside.
- Pour a little enchilada sauce into a large roaster pan, spread it around, and then set the pan aside.
- Grab a tortilla and spoon a little enchilada sauce right down the center of it.
- Place a big pile of the meat mixture on next.
- Top with plenty of both cheeses, wrap, and place into the pan.
- Once you've used up all of the meat and tortillas, spread the leftover sauce over the enchiladas and then top with plenty of cheese.
- Cook for 30 minutes or until hot and bubbly.
- Serve with hot buttered corn.
Enjoy!
Grilled Teriyaki Chicken
This recipe is the grilled version of Teriyaki Chicken. Super simple and perfect for a quick weeknight meal. We like to have some steamed veggies and minute rice as the side for this chicken.
You'll need:
1/3 cup soy sauce
1/2 cup mayonnaise
1 clove garlic
1/4 t. ground ginger
3 lg. chicken breasts, thawed
Olive oil
Start by making the same marinade you used in the original Teriyaki Chicken recipe. Just mix the soy sauce, mayonnaise, garlic, and ground ginger together in a large plastic bag. Slice the chicken into strips (however big you want) and place them in the bag. Let the chicken sit in the marinade in the fridge for at least an hour (Mine sat for over 24 hours and it tasted great!)

When you're ready to cook the chicken, lightly oil a grill using tongs and a paper towel.

Lay on it the chicken and cook over medium - high heat for around 5 - 10 minutes. Watch closely as you want it slightly charred, but not burned.

When it's done, it should be cooked through (no pink in the middle), slightly charred on the outside, but still moist on the inside. You want it to fall apart when you pick it up with a fork. Serve hot with some steamed veggies and quick minute rice.
Enjoy!
Ashleigh
Grilled Teriyaki Chicken
(prairiegalcookin.blogspot.com)
This recipe is the grilled version of Teriyaki Chicken. Super simple and perfect for a quick weeknight meal. We like to have some steamed veggies and minute rice as the side for this chicken.
You'll need:
1/3 cup soy sauce
1/2 cup mayonnaise
1 clove garlic
1/4 t. ground ginger
3 lg. chicken breasts, thawed
Olive oil
- Start by making the same marinade you used in the original Teriyaki Chicken recipe. Just mix the soy sauce, mayonnaise, garlic, and ground ginger together in a large plastic bag. Slice the chicken into strips (however big you want) and place them in the bag. Let the chicken sit in the marinade in the fridge for at least an hour (Mine sat for over 24 hours and it tasted great!)
- When you're ready to cook the chicken, lightly oil a grill using tongs and a paper towel.
- Lay on it the chicken and cook over medium - high heat for around 5 - 10 minutes. Watch closely as you want it slightly charred, but not burned.
- When it's done, it should be cooked through (no pink in the middle), slightly charred on the outside, but still moist on the inside. You want it to fall apart when you pick it up with a fork. Serve hot with some steamed veggies and quick minute rice.
Enjoy!
Grilled Kabobs

Kabobs are quite possibly the very easiest thing a person can make. When making kabobs, you can use anything you want. Chicken, beef chunks, pineapple and fruit, potatoes, mini corn-cobs, peppers, etc. The list is endless!
For this version, I simply chose to clean out the fridge a bit; just peppers and potatoes. Sometimes, simple is better, as I found here. Instead of burying the peppers and potatoes in spices, just a drizzle of olive oil, some fresh cracked pepper and salt perfectly complimented the natural flavors of the veggies.
Ideas:
Beef (such as stew meat chunks)
Chicken
Pork (such as ham chunks)
Salmon
Shrimp
Bacon
Red peppers
Green peppers
Mini corn-cobs
Tomatoes
Onions
Potatoes
Pineapple
You'll need (for this version; you can substitute any meats, veggies, or fruits you like)
3 potatoes
1 red pepper
1 green pepper
Olive oil
Freshly cracked black pepper
Salt
Skewers

Start by washing and chopping up your kabob material. I like mine in about 1-inch pieces, but you can cut them in whatever size you like!

Using your skewers, alternate which veggies you poke on.

Lay the kabobs on a cookie sheet and drizzle with olive oil. Crack some fresh pepper over them and then sprinkle on the salt. Now let's head out to the grill!

Use a paper towel to oil it lightly so the kabobs don't stick.

Lay your kabobs on the grill and cook over medium - low for around 15 - 20 minutes, depending on the grill and how done you want them. Be sure to check them every 5 minutes or so, so that they don't burn. Serve as a side or just grab off the grill and eat outside on a stick!
Enjoy!
Ashleigh
Grilled Kabobs
(prairiegalcookin.blogspot.com)
Kabobs are quite possibly the very easiest thing a person can make. When making kabobs, you can use anything you want. Chicken, beef chunks, pineapple and fruit, potatoes, mini corn-cobs, peppers, etc. The list is endless!
For this version, I simply chose to clean out the fridge a bit; just peppers and potatoes. Sometimes, simple is better, as I found here. Instead of burying the peppers and potatoes in spices, just a drizzle of olive oil, some fresh cracked pepper and salt perfectly complimented the natural flavors of the veggies.
Ideas:
Beef (such as stew meat chunks)
Chicken
Pork (such as ham chunks)
Salmon
Shrimp
Bacon
Red peppers
Green peppers
Mini corn-cobs
Tomatoes
Onions
Potatoes
Pineapple
You'll need (for this version; you can substitute any meats, veggies, or fruits you like)
3 potatoes
1 red pepper
1 green pepper
Olive oil
Freshly cracked black pepper
Salt
Skewers
- Start by washing and chopping up your kabob material. I like mine in about 1-inch pieces, but you can cut them in whatever size you like!
- Using your skewers, alternate which veggies you poke on.
- Lay the kabobs on a cookie sheet and drizzle with olive oil. Crack some fresh pepper over them and then sprinkle on the salt. Now let's head out to the grill!
- Use a paper towel to oil it lightly so the kabobs don't stick.
- Lay your kabobs on the grill and cook over medium - low for around 15 - 20 minutes, depending on the grill and how done you want them. Be sure to check them every 5 minutes or so, so that they don't burn. Serve as a side or just grab off the grill and eat outside on a stick!
Enjoy!
Spaghetti
Spaghetti is one of the easiest week-night meals you can make. Add a big pile of buttered corn and some French bread and you've got a meal that will make the entire family smile!
You'll need:
1 lg. onion
1 lb. ground beef
1 (24 ounce) jar Prego Italian sauce
1/3 of a (12 ounce) box of thin spaghetti noodles

Start by chopping up the onion and browning it with the ground beef.

Cook the spaghetti noodles according to box instructions.

Grab a large roaster pan or 9 x 13 inch pan and combine the browned beef, noodles, and Prego sauce.

Use a large hard spatula and mix it all together while chopping the noodles into bite-size pieces.

Serve with buttered corn, a slice of French bread, and some freshly grated Mozzarella cheese.
Enjoy!
Ashleigh
Spaghetti
(prairiegalcookin.blogspot.com)
Spaghetti is one of the easiest week-night meals you can make. Add a big pile of buttered corn and some french bread and you've got a meal that will make the entire family smile!
You'll need:
1 lg. onion
1 lb. ground beef
1 (24 ounce) jar Prego Italian sauce
1/3 of a (12 ounce) box of thin spaghetti noodles
- Start by chopping up the onion and browning it with the ground beef.
- Cook the spaghetti noodles according to box instructions.
- Grab a large roaster pan or 9 x 13 inch pan and combine the browned beef, noodles, and Prego sauce.
- Use a large hard spatula and mix it all together while chopping the noodles into bite-size pieces.
- Serve with buttered corn, a slice of French bread, and some freshly grated Mozzarella cheese.
Enjoy!
Homemade Ding-Dongs

You'll need:
Cakes:
3 cups flour
2 cups sugar
1/3 cup cocoa
2 t. baking soda
1 t. salt
2 eggs
1 cup milk
1 cup water
1 cup veggie oil
1 t. vanilla
Filling:
1 (3 ounce) box vanilla pudding mix
Half of the amount of milk called for in pudding mix
1 (8 ounce) tub Cool Whip

Start by making the filling. In a large bowl, combine the pudding mix and half of the amount of milk called for. Mix this together well and then fold in the Cool Whip. Stir until mixed completely and set in the fridge to chill.

In another large bowl, mix together the flour, sugar, cocoa, baking soda, and salt.

Once this is mixed together, make a well in the center and into it add the eggs…

Milk…

Water…

Oil…

And vanilla…

Mix this together well.

Line 36 cupcake trays and scoop each muffin cup a little under half full of batter. Bake at 375* for 15 - 20 minutes. Once finished baking, let them cool on a wire rack. Or if like me you aren't very patient, you can always pop them into the freezer for a couple minutes.

After cupcakes are cooled, grab a plastic sandwich bag and cut the tip off enough that you can slip a frosting tip into it. Fill the bag with the cream filling.

Now for the fun part! Place the cooled cupcake upside down on a plate or something. Use a fairly large toothpick/skewer or icepick to poke a hole into the center of the bottom of the cupcake.

Then poke the tip in and squeeze a bit of filling inside. You should be able to feel the cupcake "expand" while you pipe it full. If you're feeling creative, you can pipe a design on the top of the ding-dong to help with the presentation factor. Store the cupcakes in the fridge.

Enjoy!
Ashleigh
Homemade Ding-Dongs
(prairiegalcookin.blogspot.com)
You'll need:
Cakes:
3 cups flour
2 cups sugar
1/3 cup cocoa
2 t. baking soda
1 t. salt
2 eggs
1 cup milk
1 cup water
1 cup veggie oil
1 t. vanilla
Filling:
1 (3 ounce) box vanilla pudding mix
Half of the amount of milk called for in pudding mix
1 (8 ounce) tub Cool Whip
- Preheat oven to 375*
- Start by making the filling. In a large bowl, combine the pudding mix and half of the amount of milk called for. Mix this together well and then fold in the Cool Whip. Stir until mixed completely and set in the fridge to chill.
- In another large bowl, mix together the flour, sugar, cocoa, baking soda, and salt.
- Make a well in the mixture and pour in the eggs, milk, water, oil, and vanilla. Mix this well.
- Line 36 cupcake trays and scoop each muffin cup a little under half full of batter. Bake for 15 - 20 minutes. Once finished baking, let them cool on a wire rack. Or if like me you aren't very patient, you can always pop them into the freezer for a couple minutes.
- After cupcakes are cooled, grab a plastic sandwich bag and cut the tip off enough that you can slip a frosting tip into it. Fill the bag with the cream filling.
- Now for the fun part! Place the cooled cupcake upside down on a plate or something. Use a fairly large toothpick/skewer or icepick to poke a hole into the center of the bottom of the cupcake.
- Then poke the tip in and squeeze a bit of filling inside. You should be able to feel the cupcake "expand" while you pipe it full. If you're feeling creative, you can pipe a design on the top of the ding-dong to help with the presentation factor. Store the cupcakes in the fridge.
Enjoy!
For The Love Of A Spice Cabinet

I love spices for their colors, flavors, and smells. They're all different and each have something unique to offer. For this, I just grabbed a few of my favorites items out of the spice cabinet and started playing around. Instead of just tossing together a few pictures, I figured I'd add a little info about each so that your time spent reading this post was put to good use….

First let's start with cocoa; now technically, some people say cocoa is a spice and others say it isn't. I'm siding with those that say it isn't, but it really doesn't matter! Cocoa is really ground up cocoa beans from the cacao tree.
When the pods are harvested, they are laid out in piles or on grates and allowed to "sweat", this means that the thick pulp vanishes and leaves behind the beans. Then the wet beans are taken to a place where they are dried and then they ferment. After that, they are shipped to places to make the cocoa powder, chocolate, etc. The beans are roasted, then cracked and their shells are removed. After all of this, the pieces of cocoa beans are called "nibs". The nibs can then separated into cocoa butter and cocoa powder, using a hydraulic press. Now you've got the cocoa we get in our little brown Hershey's boxes!

Next comes a wonderful smelling spice… Cinnamon! The name "cinnamon" came from the Greeks and not only has the spice been considered a gift for kings and gods, it's referred to in the Hebrew Bible in Proverbs and Song of Solomon.
Cinnamon comes from either the Ceylon Cinnamon tree or the Cassia tree. The tree is grown for two to three years and then coppiced (the tree is cut back to ground level, covered with soil, and then the shoots are allowed to grow out of it). Once the shoots have grown out of the stump, they are cut off and then stripped of their bark, which is laid out in the sun to dry. When the bark dries, it curls into "quills" (or what we call sticks) and then is packaged and shipped. For the ground cinnamon, the sticks are ground up gently and you're done!
Cinnamon comes from either the Ceylon Cinnamon tree or the Cassia tree. The tree is grown for two to three years and then coppiced (the tree is cut back to ground level, covered with soil, and then the shoots are allowed to grow out of it). Once the shoots have grown out of the stump, they are cut off and then stripped of their bark, which is laid out in the sun to dry. When the bark dries, it curls into "quills" (or what we call sticks) and then is packaged and shipped. For the ground cinnamon, the sticks are ground up gently and you're done!

My favorite thing about paprika is the color. I love the bright red!
Paprika is a spice made from dried and then ground, sweet bell or chili peppers. Hot, sweet, smoked, plain, Spanish, Hungarian - There are many different variations of paprika and it's the fourth most used spice in the world. One use for paprika is coloring. Whenever a dish is bland and colorless, paprika is generally heated and added; because when heated, paprika releases its color and flavor.

Ground mustard (also known as dry mustard) is made from ground mustard seeds. Not only are the seeds of the mustard plant used, but the leaves and stalk can be used as well. There are three different kinds of mustard seeds; white (or yellow), brown (Asian), and black. Black mustard seeds have mostly been replaced by brown seeds as they can be grown and harvested more economically. In terms of how pungent the seeds are, black is much more pungent than the mild white seeds, while the brown seeds are in between them.
Typically, to make English mustard, the white and brown seeds are blended together; for Chinese and European mustards, the brown seeds are the main ingredient.

Ok, so yes. Parsley is an herb, not a spice. But it was one of those things I grabbed and it's in the picture. So I think I'll tell you a bit about it anyway!
Basically, dried parsley is just that. Dried parsley! While there are more than 30 different varieties of parsley, the most common of them are the curly-leaf parsley and then the more flavorful flat-leaf parsley. Since parsley doesn't hold up very well during cooking, it's generally added at the end of making the dish. Dried parsley adds mostly color and curly parsley is used for garnish, while Italian parsley is used for flavor.

The last thing I grabbed was peppercorns. Whenever I'm cooking, I like to grind peppercorns instead of using the pre-ground pepper as I feel it adds more flavor if it's just been ground. Peppercorns are the fruit from a flowering vine called the Pepper plant. The fruits (peppercorns) are dried and then sold whole or ground. Black pepper is the world's most traded spice. There are actually six different varieties of peppercorns; Pink, Green, Malabar Black, Sarawak White, Tellicherry Black, and Muntok White.

Well, I think I'm feeling rather hungry after typing all of this!
Ashleigh
Strawberry Sparkle Cake

This cake turned out to be delish! It does take a little while to make, but with a little planning it can be a snap and would make a great addition to an Easter table. I found it originally on The Pioneer Woman, but once I started making it, I also started tweaking a bunch of little things here and there. Enjoy!
WARNING: When serving this cake, please, for your safety be careful!!! People seem to get a little crazed when eating it and will shower you with hugs, laughter, tears, and demands for the recipe!
You'll need:
Cake:
15 egg whites, room temperature
1 t. cream of tarter
1 1/2 cup sugar, sifted four times
1 cup flour
2 T. cornstarch
1/4 t. salt
1 t. vanilla
Filling:
1 (3 oz.) package strawberry jello
2 cups water, boiling
1-pound frozen sliced strawberries
Topping:
1 (8 ounce) tub Cool Whip

Start by sifting the flour, cornstarch, and salt together four or five times. Set aside.

In a large bowl, separate the egg whites from the yolks.

Be sure to not throw away the yolks! You can use an ice cube tray to freeze them separately or use them in French Toast.

In a large mixer, beat the egg whites until they're foamy or frothy, they should still be mostly liquid with a lot of bubbles on top.

Once the whites are foamy, add the cream of tarter.

And beat them on high until they're stiff…

Like this!

With the mixer on low, gently sprinkle in the sifted sugar.

Once the sugar has been added, you can gently fold in the sifted flour mixture.

Add the vanilla.


Pour the batter into a very clean (and not-greased!) bundt pan. Bake at 350* for 35 - 45 minutes. Be sure to leave the oven door closed while baking!

Meanwhile, you can whip up the filling. Start by mixing the jello powder and boiling water together in a bowl.

Once jello powder is dissolved, stir in the strawberries gently. Set this in the fridge to thicken.

By now, the cake should be done, let it cool upside down on a wine, vinegar, or olive oil bottle. Place it gently onto a wire rack when cooled.

Now here's my favorite part! Cut the top 1-inch of the cake off and set aside.

About 1-inch from the outside edge, make a cut all the way around the cake. Don't cut through the bottom, just cut down an inch or so.

Cut another circle about 1-inch closer to the center of the cake. Follow the same instructions as before.

Use your fingers to gently pull the cake out from between your two cuts and create a "trench".

This is what it should look like at this stage.

Here's your filling that's now thick…

Gently spoon filling into the trench and fill it until it's level with the rest of the cake.


Gently place the "lid" back on the cake. Set it in the fridge for a couple of hours, or if you're in a hurry, set it in the freezer for around 45 minutes to an hour.

Once it's cooled, pull out your tub of Cool Whip and place several big ol' dollops on the cake.

Use a knife and spread the Cool Whip around until the entire cake as been liberally frosted. (You may not use all of the topping.)


Slice and serve with a couple of fresh strawberries and a smile!
Enjoy and Happy Easter!
Ashleigh
Copy, Paste, and Print for the recipe below:
Strawberry Sparkle Cake
(prairiegalcookin.blogspot.com)
This cake turned out to be delish! It does take a little while to make, but with a little planning it can be a snap and would make a great addition to an Easter table.
WARNING: When serving this cake, please, for your safety be careful!!! People seem to get a little crazed when eating it and will shower you with hugs, laughter, tears, and demands for the recipe!
You'll need:
Cake:
15 egg white, room temperature
1 t. cream of tarter
1 1/2 cup sugar, sifted four times
1 cup flour
2 T. cornstarch
1/4 t. salt
1 t. vanilla
Filling:
1 (3 oz.) package strawberry jello
2 cups water, boiling
1-pound frozen sliced strawberries
Topping:
1 (8 ounce) tub Cool Whip
- Preheat oven to 350*
- Start by sifting the flour, cornstarch, and salt together four or five times. Set aside.
- Separate the egg whites and yolks.
- Beat the egg whites on high until foamy and then add the cream of tarter.
- Continue to beat on high until the whites form stiff peaks.
- With the mixer on low, sprinkle in the sugar gently.
- After sugar is mixed in, gently fold in the sifted flour mixture.
- Stir in the vanilla.
- Slowly pour the batter into a ungreased (and very clean) bundt pan and bake for 35 - 45 minutes.
- While cake is baking, make the filling by combining the boiling water and jello powder in a large bowl.
- Once powder is dissolved, stir in the sliced, frozen strawberries. Set in the fridge to thicken.
- When the cake is done baking, pull it out and immediately set it upside down on a wine, vinegar, or olive oil bottle to cool.
- Once cooled, place it gently onto a wire rack and slice the top 1-inch of the cake off. Set it aside carefully.
- Use a sharp knife to cut a circle 1-inch away from the outside edge of the cake. Cut down an inch or so.
- Cut another circle 1-inch away from the first, following the same instructions.
- Use your fingers to pull the cake out from inside the two circles to create a "trench".
- By now the filling should be thick and you can gently spoon it into the trench. Fill the trench until the cake and filling is level all the way across.
- Gently place the "lid" back on the cake and set in the fridge for a few hours or in the freezer for 45 minutes to an hour. (I left mine in the fridge overnight.)
- After the cake has cooled, place a bunch of big ol' dollops of Cool Whip on the cake and use a knife to spread it until the cake is completely covered.
- Serve with fresh strawberries and a smile!
Enjoy!
Lemon Poppy Seed Muffins

I found this wonderful recipe over at Entertaining with Beth. As Beth says, the poppy seeds add a nice nutty flavor that combines with the lemon. The glaze really pulls it all together.
You'll Need:
Muffins:
3 eggs, room temperature
3/4 cup sugar
3/4 cup butter, melted
1/2 cup water
3 T. lemon zest
1 t. lemon extract
1 T. poppy seeds
1 1/2 cups flour
1 T. baking powder
1/2 t. baking soda
1 t. salt
Glaze:
1/2 cup powdered sugar
2 T. heavy cream

Start by whisking together the flour, baking powder, baking soda, and salt.


In a large bowl, combine the eggs…

Sugar.

Butter.

Lemon zest.

Lemon extract.

And lastly, poppy seeds. Gently combine this all and then mix in the flour.


Line some muffins tins.

And plop in one scoop of batter. Bake at 400* for 10 - 12 minutes.


When done, pop the muffins onto a wire rack and cool.

Once cooled, make the glaze by combining the cream and powdered sugar in a bowl. You can spread a little glaze over the muffins and then top with a few poppy seeds and a little lemon zest.

Enjoy looking at the muffins for awhile…

Just look… Don't eat…

And you're saying "Ha! Yea, right!" Well that's fine, I didn't do that either..
Enjoy!
Ashleigh
Copy, Paste, and Print for the recipe below:
Lemon Poppy Seed Muffins
(prairiegalcookin.blogspot.com)
I found this wonderful recipe over at Entertaining with Beth. As Beth says, the poppy seeds add a nice nutty flavor that combines with the lemon. The glaze really pulls it all together.
You'll Need:
Muffins:
3 eggs, room temperature
3/4 cup sugar
3/4 cup butter, melted
1/2 cup water
3 T. lemon zest
1 t. lemon extract
1 T. poppy seeds
1 1/2 cups flour
1 T. baking powder
1/2 t. baking soda
1 t. salt
Glaze:
1/2 cup powdered sugar
2 T. heavy cream
- Preheat the oven to 400*
- Start by whisking together the flour, baking powder, baking soda, and salt.
- In a large bowl, combine the eggs, sugar, butter, water, lemon zest, lemon extract, and poppy seeds.
- Gently stir in the flour mixture; don't over-mix!
- Line muffins tins and fill a little under half full with batter. Bake for 10 - 12 minutes.
- When cooked, plop the muffins out onto a wire rack to cool.
- Make the glaze by combining the powdered sugar and heavy cream and then spoon or drizzle a little onto the muffins. Garnish with a bit of lemon zest and a few poppy seeds.
Enjoy!
Scrambled Eggs

Scrambled eggs are one of the easiest things to make. Besides that, there are so many different variations you could make that they never get boring. This version uses two eggs per person and this recipe is made to feed at least six people.
You'll need:
12 eggs
2 - 3 cups milk
1/2 green pepper, chopped
1/2 red pepper, chopped
1/2 onion, chopped
12 slices American cheese
Salt
Freshly cracked pepper

Start with crackin' your eggs. As you can see here, I used chicken and turkey. Yummy!


Beat the eggs in a large bowl.

Pour in the milk…

And then tear up the cheese and add it. Mix together and set aside.

Over medium - low flame, sauté the onions and peppers.

Once veggies are sautéed, pour in the eggs and cook over low heat stirring constantly.

Once the eggs have set up and there is very little juice, serve them hot with a piece of buttered toast and some fresh fruit.
Enjoy!
Ashleigh
Scrambled Eggs
(prairiegalcookin.blogspot.com)
Scrambled eggs are one of the easiest things to make. Besides that, there are so many different variations you could make that they never get boring. This version uses two eggs per person and this recipe is made to feed at least six people.
You'll need:
12 eggs
2 - 3 cups milk
1/2 green pepper, chopped
1/2 red pepper, chopped
1/2 onion, chopped
12 slices American cheese
Salt
Freshly cracked pepper
- Start with crackin' your eggs. As you can see here, I used chicken and turkey. Yummy!
- Beat the eggs in a large bowl.
- Pour in the milk…
- And then tear up the cheese and add it. Mix together and set aside.
- Over medium - low flame, sauté the onions and peppers.
- Once veggies are sautéed, pour in the eggs and cook over low heat stirring constantly.
- Once the eggs have set up and there is very little juice, serve them hot with a piece of buttered toast and some fresh fruit.
Enjoy!
Twice-Fried Cheese Sticks

I love cheese and most anything fried. (Just being honest!) So when I was stranded in the kitchen the other day (and yes, I do mean stranded!) I decided to whip up these little babies. They're quick and easy, and they taste great!
The reason for frying them twice is that once doesn't seem to get the outer crust thick enough. The extra frying doesn't hurt anything, it just makes the outer crust thicker and a little more crispy. One batch makes 6 sticks (1 - 2 servings), so you'll want to double or triple it as needed!
You'll need:
3 mozzarella cheese sticks, halved
1/2 cup Italian style bread crumbs
1 egg
1/2 t. Italian seasoning
1-1/2 cup veggie oil

Pour the oil into a small skillet and turn it on medium flame.
Start by slicing your cheese sticks in half and set aside. Pour the Italian crumbs into a bowl and set aside too. Beat the egg in another bowl with the Italian seasoning.

Roll the cheese sticks in the egg mixture one at a time.

Then drudge them in the crumbs.

Gently and carefully place the sticks in the hot oil. Fry for 30 - 60 seconds on each side or until golden brown.

Pull out and let sit for one minute on a paper lined towel.

Roll the fried cheese sticks in egg again.

Drudge them through the crumbs once again. This is the last roll, so you might want to get them fairly thick with crumbs.

And then fry in the oil for about 20 seconds on each side. Watch closely as they get really crispy fast!

Serve hot with seasoned sauce.
Enjoy!
Ashleigh
Copy, Paste, and Print for the recipe below:
Twice-Fried Cheese Sticks
(prairiegalcookin.blogspot.com)
I love cheese and most anything fried. (Just being honest!) So when I was stranded in the kitchen the other day (and yes, I do mean stranded!) I decided to whip up these little babies. They're quick and easy, and they taste great!
The reason for frying them twice is that once doesn't seem to get the outer crust thick enough. The extra frying doesn't hurt anything, it just makes the outer crust thicker and a little more crispy. One batch makes 6 sticks (1 - 2 servings), so you'll want to double or triple it as needed!
You'll need:
3 mozzarella cheese sticks, halved
1/2 cup Italian style bread crumbs
1 egg
1/2 t. Italian seasoning
1-1/2 cup veggie oil
- Pour the oil into a small skillet and turn it on medium flame. Start by slicing your cheese sticks in half and set aside. Pour the Italian crumbs into a bowl and set aside too. Beat the egg in another bowl with the Italian seasoning.
- Roll the cheese sticks in the egg mixture one at a time.
- Then drudge them in the crumbs.
- Gently and carefully place the sticks in the hot oil. Fry for 30 - 60 seconds on each side or until golden brown.
- Pull out and let sit for one minute on a paper lined towel.
- Roll the fried cheese sticks in egg again.
- Drudge them through the crumbs once again. This is the last roll, so you might want to get them fairly thick with crumbs.
- And then fry in the oil for about 20 seconds on each side. Watch closely as they get really crispy fast!
- Serve hot with seasoned sauce.
Enjoy!
Pain d'Epi (Wheat Stalk Bread)
This is another great recipe from the Artisan Bread in Five Minutes cookbook. It uses the basic dough recipe we made for the Baule Bread and you'll follow the same instructions for it right up to leaving it in the fridge overnight. So the only thing I need to show you is how to make it on baking day!
You'll need:
Dough from Baule Bread recipe, using the same methods to make it.
Whole wheat flour, for dusting

After it's sat overnight in the fridge, dust a work surface with whole wheat flour. Pluck a 1-pound (grapefruit size) piece of dough and shape it into a ball. After making a ball, roll it back and forth between your palms to shape it into a baguette. Allow it to rest on the floured surface for 30 minutes.

Twenty minutes before baking time, start preheating the oven to 450* and stick the baking stone inside it. Don't forget to add the broiler pan on another rack. After the baguettes have rose for 30 minutes, dust with a little flour and grab a pair of kitchen shears. Hold them at a 45* angle to cut from the top of the dough, down to within 1/4-inch of the bottom.

Pull each piece to the side after cutting, alternating sides.

Place the wheat stalk loaves on the baking stone and in the oven. Pour 1 cup of hot tap water into the broiler pan. Bake for 25 minutes or until the loaves are a deep brown and crisp.

Cool the loaves before you start breaking off the wheat stalk pieces, or if you can't wait, smother with butter and eat hot!
Enjoy!
Ashleigh
Pain d'Epi (Wheat Stalk Bread)
(prairiegalcookin.blogspot.com)
This is another great recipe from the Artisan Bread in Five Minutes cookbook. It uses the basic dough recipe we made for the Baule Bread and you'll follow the same instructions for it right up to leaving it in the fridge overnight. So the only thing I need to show you is how to make it on baking day!
You'll need:
Dough from Baule Bread recipe, using the same methods to make it.
Whole wheat flour, for dusting
- After it's sat overnight in the fridge, dust a work surface with whole wheat flour. Pluck a 1-pound (grapefruit size) piece of dough and shape it into a ball. After making a ball, roll it back and forth between your palms to shape it into a baguette. Allow it to rest on the floured surface for 30 minutes.
- Twenty minutes before baking time, start preheating the oven to 450* and stick the baking stone inside it. Don't forget to add the broiler pan on another rack. After the baguettes have rose for 30 minutes, dust with a little flour and grab a pair of kitchen shears. Hold them at a 45* angle to cut from the top of the dough, down to within 1/4-inch of the bottom.
- Pull each piece to the side after cutting, alternating sides.
- Place the wheat stalk loaves on the baking stone and in the oven. Pour 1 cup of hot tap water into the broiler pan. Bake for 25 minutes or until the loaves are a deep brown and crisp.
- Cool the loaves before you start breaking off the wheat stalk pieces, or if you can't wait, smother with butter and eat hot!
Enjoy!
Boule Bread
This is an amazing cookbook! We've had it for quite awhile, but I never really took time to look at it much. Thankfully, I finally sat down and started leafing through the pages the other night. What I learned was quite fascinating; I learned so much in fact that I can't even start to tell you all of it, so here's the link to the authors website: Artisan Bread in Five Minutes a Day. Here's the basic recipe they use for most of the breads in the cookbook:

The term "boule" is French for "ball", referring to the easy-to-master shape of the dough. As they state in the book, the dough needs to be wet, but not too wet to hold it's shape. You'll also learn about how a "gluten cloak" can substitute for kneading the dough. This easy to make bread can be made the night before, left in the fridge overnight (but not in an air-tight container as the gases need to escape), and then shaped and baked the next morning.
*Note - Run 1 1/2 cups of water through the coffee pot and then add it to 1 1/2 cups of cold water. Turns out the perfect temperature for proofing the yeast.
**Note - When measuring the flour for this dough, you'll need to use the scoop-and-sweep method. Don't sift or pack the flour, just scoop up the flour and sweep it with a knife.
This batch will make four 1-pound loaves. You can easily double or split the recipe as needed.
You'll need:
3 cups lukewarm water *
1 1/2 T. yeast
1 1/2 T. coarse salt
6 1/2 cups flour **
Cornmeal for the pizza peel

Start with the water using the tip mentioned above. Run half of the amount of water needed through the coffee pot and then mix it with the other half of water (cold).

Sprinkle over the water, the yeast and salt.

Once the yeast has started to foam a bit (it doesn't have to completely dissolve) you can stir in the flour using the scoop-and-sweep method (please see note). Scoop it up...

And sweep it across.

Mix the dough until the wet spots are gone. Store overnight in the fridge (or at least 3 hours), in a bucket or something that isn't airtight.

The next morning, pull out the dough and plop it onto a cornmeal covered surface. I didn't have cornmeal, so I used whole wheat flour instead.


Cut the dough into four equal pieces (1-pound each (you don't have to use it all if you don't want to) and use your hands to gently stretch the surface of the dough down around the side and to the bottom. Basically, form a smooth ball of dough without kneading it any, it should take from 30 to 60 seconds to do this for each one. Let the dough rise on the cornmeal (or whole wheat) peal for 40 minutes. Twenty minutes before the resting period is up, start preheating the oven and set the baking stone inside.

After the dough has rose for 40 minutes, "slash" it with a serrated knife, 1/4-inch deep, and in a pattern. Place it on the baking stone and inside the oven. On another rack, set a broiler pan with 1 cup of hot tap water in it to create the steam needed for baking. Don't open the oven door while the bread is baking as it will release the steam.

Bake the bread for 30 minutes or until the crust is browned and crisp. When you go to remove the bread loaf from the oven, it will start "singing" or crackling, as it won't have been exposed to the room temperature air.

Allow the bread to cool on a wire rack before slicing and enjoy!

Ashleigh
Copy, Paste, and Print for the recipe below:
Boule Bread
(prairiegalcookin.blogspot.com)
The term "boule" is really French for "ball", referring to the easy-to-master shape of the dough. As they state in the book, the dough needs to be wet, but not too wet to hold it's shape. You'll also learn about how a "gluten cloak" can substitute for kneading the dough. This easy to make bread can be made the night before, left in the fridge overnight (but not in an air-tight container as the gases need to escape), and then shaped and baked the next morning.
*Note - Run 1 1/2 cups of water through the coffee pot and then it to 1 1/2 cups of cold water. Turns out the perfect temperature for proofing the yeast.
**Note - When measuring the flour for this dough, you'll need to use the scoop-and-sweep method. Don't sift or pack the flour, just scoop up the flour and sweep it with a knife.
This batch will make four 1-pound loaves. You can easily double or split the recipe as needed.
You'll need:
3 cups lukewarm water *
1 1/2 T. yeast
1 1/2 T. coarse salt
6 1/2 cups flour **
Cornmeal for the pizza peel
- Start by proofing the yeast, sprinkle the yeast and salt over the water and watch to see if it foams.
- After it has started to foam, stir in the flour (be sure to use the scoop-and-sweep method) using a wooden spoon or a stand mixer with a dough hook; don't knead!
- Allow the dough to rise in a not-airtight container for 2 hours at room temperature.
- After it rises, place it in the fridge for at least 3 hours, but overnight is better.
- To bake, you'll want to pull off 1-pound of dough (1/4 of the batch) and shape it into a smooth ball; pulling the sides down to the bottom of the ball.
- You'll want to spread some cornmeal (I used whole wheat flour instead) over a surface to work the dough on. Let the dough ball rise on the cornmeal for about 40 minutes.
- Twenty minutes before baking time, start preheating the oven to 450* and stick the baking stone inside to warm up. Place a broiler rack on another shelf.
- Once the dough has rose, dust the loaves with some whole wheat flour and "slash" a pattern into the loaves, 1/4 inch deep, with a serrated knife.
- Place the loaves on the stone and back in the oven, pour 1 cup of hot tap water into the broiler pan and shut the door.
- Don't open the door!
- Let them bake for 30 minutes or until nicely browned and firm.
- Cool on a wire rack and slice.
Enjoy!
Peasant Bread
Ya gotta love Pinterest! I know I sure do. Speaking of Pinterest, that's where I found this amazing bread recipe. It's called "Peasant Bread" and it's from Alexandra's Kitchen. The amazing thing about this bread is how simple it is. No kneadin', it's quick, and it bakes in bowls. What more could ya want? Not much, my friend. Not much.
Are you ready to get started? Me too. I'm starved.
*Note - The recipe calls for 4 cups of all-purpose flour, I use 2 cups all-purpose and 2 cups whole wheat. If you decide to use whole wheat, be sure to include the gluten.
**Note - To get lukewarm water, I found that if you run 1 cup of water through the coffee pot and then add it to 1 cup of cold water, the temperature is perfect!
***Note - If you want a warm spot for your dough to rise, turn the oven on to 350* and let it preheat for 1 minute. Turn it off and pop the dough in and let it rise in the dark, quiet, warm, little oven.. Speaking of dark, quiet, and warm.. I think I might just jump right in there with it! (I'm just kidding!)
You'll need:
4 cups all-purpose flour*
2 t. salt
2 cups lukewarm water**
1 T. sugar
2 t. active-dry yeast
Room temperature butter

Whisk together the flour and salt in a large bowl. Set this aside.

Dissolve the sugar into the lukewarm water (see note **) and then sprinkle the yeast over the water. Let sit for a few minutes until it's foaming and bubbly.

Once the yeast has started foaming, add it to the flour and salt. Stir together until the flour is absorbed and the little flour patches are gone around the bowl.

Refer back to note*** and pop your dough in the warm oven with a damp tea towel draped over the bowl. Leave it there for 1 - 2 hours to rise; if you let it sit for 2 hours, this will make the second rising go faster.

As soon as the first rising is over, take the room temperature butter and grease the inside of a 1 L and 1.5 L glass (Pyrex) bowl. You can use these two bowls for a loaf each (2 loaves from this batch) or use a 2 L bowl for the whole batch.

Use a couple of forks and separate the dough (if using two bowls) or plop it all in the one 2 L bowl.

Let the dough rise for 20 - 30 minutes and then bake at 425* for 15 minutes. After those 15 minutes, drop the temperature down to 375* and bake for another 15 minutes.

Once the loaves are cooked, plop them out onto a wire rack and cool or you can cool them for 10 minutes and then slice and serve warm.


After cooled, slice the loaves and enjoy!
Ashleigh
Peasant Bread
(prairiegalcookin.blogspot.com)
*Note - The recipe calls for 4 cups of all-purpose flour, I use 2 cups all-purpose and 2 cups whole wheat. If you decide to use whole wheat, be sure to include the gluten.
**Note - To get lukewarm water, I found that if you run 1 cup of water through the coffee pot and then add it to 1 cup of cold water, the temperature is perfect!
***Note - If you want a warm spot for your dough to rise, turn the oven on to 350* and let it preheat for 1 minute. Turn it off and pop the dough in and let it rise in the dark, quiet, warm, little oven.. Speaking of dark, quiet, and warm.. I think I might jump there with it! (I'm just kidding!)
You'll need:
4 cups all-purpose flour*
2 t. salt
2 cups lukewarm water**
1 T. sugar
2 t. active-dry yeast
Room temperature butter
- Whisk together the flour and salt; set this aside.
- Dissolve the sugar in the lukewarm water and then sprinkle over it the yeast.
- Once the yeast is foaming and bubbly, add it to the flour and salt mixture.
- Refer back to note*** and pop your dough in the warm oven to rise for 1 - 2 hours with a damp tea towel over the bowl. If you let it rise 2 hours, it'll make the second rising go faster.
- Take the room temperature butter and grease a 1 L and a 1.5 L bowl (if you want two loaves from this batch) or a 2 L bowl for one loaf.
- If making two loaves, split the dough and plop it into the bowls. If not, go ahead and plop all of the dough in the 2 L bowl.
- Let the dough rise in the bowls 20 - 30 minutes and then bake the loaf at 425* for 15 minutes. Then drop the temperature down to 375* and bake for another 15 minutes.
- Once the loaves are baked, plop them out of the bowls onto wire racks and cool at least 10 minutes before slicing.
Enjoy!
Cinnamon Roll Swirl Cake
You'll need:
Cake:
3 cups flour
1/4 t. salt
1 cup sugar
4 t. baking powder
1 1/2 cup milk
2 eggs
2 t. vanilla
1/2 cup butter, melted
Topping:
1 cup butter, melted
1 cup brown sugar
2 T. flour
2 T. cinnamon
Glaze:
2 cups powdered sugar
5 T. milk
1 t. vanilla

Start by melting the butter. Set aside.

In a large bowl, combine the flour, salt, sugar, baking powder, milk, eggs, and vanilla. Mix well and then slowly pour in the butter. Gently combine.

Pour batter into a greased 9 x 13 inch pan and set aside.

In another bowl, combine the brown sugar, flour, and cinnamon.

And the butter. Mix together until smooth.


Pour the cinnamon mixture over the batter (yep, you'll want to use it all!) and then use a knife to swirl it through.

Bake at 350* for 30 - 40 minutes.

Pull the cake out and let it sit for 5 minutes.

While the cake is resting, make the glaze by combining all of the ingredients in a large bowl. Stir until smooth.

Drizzle it over the cake. Serve warm or cooled. Either way is great!
Enjoy!
Ashleigh
Cinnamon Roll Swirl Cake
(prairiegalcookin.blogspot.com)
You'll need:
Cake:
3 cup flour
1/4 t. salt
1 cup sugar
4 t. baking powder
1 1/2 cup milk
2 eggs
2 t. vanilla
1/2 cup butter, melted
Topping:
1 cup butter, melted
1 cup brown sugar
2 T. flour
2 T. cinnamon
Glaze:
2 cups powdered sugar
5 T. milk
1 t. vanilla
Preheat the oven to 350*
In a large bowl, combine the flour, salt, sugar, baking powder, milk, eggs, and vanilla.
Once it's mixed, pour in the melted butter and gently stir.
Pour batter into a greased 9 x 13 inch pan. Set aside.
To make the topping; in a large bowl, combine the butter, brown sugar, flour, and cinnamon.
Pour this mixture over the batter and swirl with a knife.
Bake for 30 - 40 minutes. Once finished baking, pull out and let the cake rest for 5 minutes.
While the cake is resting, make the glaze.
Combine the powdered sugar, milk, and vanilla in a bowl and then drizzle it all over the cake.
Serve warm or cooled.
Enjoy!
Pizza Casserole
You'll need:
3 cups uncooked egg noodles
1 pound ground beef
1 onion, chopped
2 cloves garlic, minced
1 green bell pepper, chopped
1 cup pepperoni, sliced
1 (24 ounce) jar Prego sauce
4 T. milk
2 1/2 cup mozzarella cheese, shredded

Start by browning the beef, onion, garlic, and pepper together. While the meat is browning, cook the noodles.

Slice the pepperoni and set aside.

Once the meat is thoroughly cooked, stir in the pepperoni, Prego, and milk.

Place the cooked noodles in a 9 x 13 inch dish.

And then pour in the meat mixture. Bake at 350* for 15 minutes.

Pull out the casserole and top with the cheese. Place it back in the oven for another 5 - 10 minutes.

Serve with buttered corn and a leafy salad.
Enjoy!
Ashleigh
Pizza Casserole
(prairiegalcookin.blogspot.com)
You'll need:
3 cups uncooked egg noodles
1 pound ground beef
1 onion, chopped
2 cloves garlic, minced
1 green bell pepper, chopped
1 cup pepperoni, sliced
1 (24 ounce) jar Prego sauce
4 T. milk
2 1/2 cup mozzarella cheese, shredded
Preheat the oven to 350*
Start by putting your noodles on to cook.
Brown the beef, onion, garlic, and pepper together.
Once meat is cooked, stir in the pepperoni, Prego, and milk.
Place the cooked noodles in a 9 x 13 inch dish and pour over the meat mixture. Stir to combine.
Bake in the oven for 15 minutes.
Pull out and top with the cheese.
Bake for another 5 - 10 minutes.
Pull out and serve with buttered corn and a leafy salad.
Enjoy!
Egg Salad
Believe it or not, this amazing egg salad is actually a "low-carb" recipe. (I know, surprising isn't it?!) Now usually, I'm rather leery of a lot of the ingredients and foods that are fat-free, low-carb, etc as they tend to flop when used in baking or cooking; but with this one there's no need! Try it and you'll find it tastes great!
You'll need:
7 hard boiled eggs, chopped (mine turned out more sliced than chopped)
1/4 cup mayo
2 t. lemon juice
1 T. onion, chopped
1/4 t. salt
1/4 t. black pepper
1/2 cup celery, diced (or chopped finely)

Start by chopping your eggs. Set them aside.

Combine in a large bowl, the mayo, lemon juice, onion, salt, pepper, and celery.

Stir together gently.

Add in the eggs and stir together (gently!)

Serve alongside some fresh carrots and celery or on top of a leafy salad.
Enjoy!
Ashleigh
Egg Salad
(prairiegalcookin.blogspot.com)
You'll need:
7 hard boiled eggs, chopped (mine turned out more sliced than chopped)
1/4 cup mayo
2 t. lemon juice
1 T. onion, chopped
1/4 t. salt
1/4 t. black pepper
1/2 cup celery, diced (or chopped finely)
Chop the eggs and set aside.
In a large bowl, combine the mayo, lemon juice, onion, salt, pepper, and celery.
Add the eggs and gently combine.
Serve alongside some fresh carrots and celery or on top of a leafy salad.
Enjoy!
Enjoy!
Ham
This is a super yummy way to cook a ham. Set it in a large pot on the stove for a few hours and you're done!
You'll need:
1 whole 5 - 7 pound ham, precooked
1 can Sprite
Whole cloves
Brown sugar

Place the thawed and precooked ham in a large pot on the stove and pour over it the can of Sprite.

Use a toothpick or ice-pick and poke holes all around the ham, this makes it easier to pop the whole cloves into the ham.

Pop in the cloves (as many or few as you like, we like to cover the top half of the ham with cloves about 1-inch apart) and then….

Use your hands to grab some brown sugar and pat it onto the ham. Go ahead, grab a glob and just push it against the ham.. It'll stick. Cover the top half of the ham. Pop on the lid of the pot and cook over medium flame until completely heated through. Don't lift the lid! The ham needs the moisture.
When heated, the brown sugar will have melted off and you can just pull the cloves out and pitch 'em.

Serve your wonderfully amazing ham with scalloped potatoes and green beans… Or whatever you want!
Enjoy!
Ashleigh
Copy, Paste, and Print for the recipe below:
Ham
(prairiegalcookin.blogspot.com)
You'll need:
1 whole 5 - 7 pound ham, precooked
1 can Sprite
Whole cloves
Brown sugar
Place your thawed and precooked ham in a large pot.
Pour the can of Sprite over the ham and then use an ice-pick to poke holes for the cloves. Poke them all over the ham.
Using your hands, pat the brown sugar all over the top half of the ham.
Place the lid on the pot and cook over medium flame until heated through, pull out the cloves.
Serve warm with some scalloped potatoes and green beans.
Enjoy!
Chicken Alfredo

I'm a big fan of Pizza Hut's Chicken Alfredo, but I wanted to eat Alfredo that's reasonably easy to make at home and gives you more than just a little tray full. So I started looking at Alfredo recipes and experimenting with them. A little tip, I like to cook the chicken through and then do a "quick sear" of the sides. I was going for a "blackened" chicken look, but didn't quite reach it.
You'll need:
1 (16 ounce) bag medium egg noodles
4 - 5 large chicken breasts, thawed
Olive oil
Freshly cracked black pepper
Coarse sea salt
1 cup (2 sticks) butter
2 bricks (8 ounces each) cream cheese
4 t. garlic powder
1 t. garlic salt
3 cups milk
1 1/2 cups grated Parmesan cheese

Start by pouring some olive oil, sea salt, and freshly cracked black pepper in a large skillet over low flame.

Place your chicken breasts in the skillet and sprinkle over some salt and pepper. Cook thoroughly and then turn off heat. Remove the chicken and wipe out the skillet, turn it on medium - high flame and drop the chicken back in the skillet. This "dry heat" should blacken or at least darken the chicken somewhat.


Move the chicken to a cutting board and chop it.

Set the chicken aside and start boiling some water for the noodles. You can cook them while making the sauce.

Melt the butter in a very large saucepan over low heat.

Add the cream cheese and whisk together.

Be sure to not let the mixture boil and stir in the garlic powder, salt, and milk. Just add a cup of milk at a time and stir for a couple minutes between additions.

After adding the milk, stir in the Parmesan cheese and pepper.

Cook the sauce for a few more minutes and then serve.

Serve with hot buttered pasta, peas, and the chopped chicken.
Enjoy!
Ashleigh
Chicken Alfredo
(prairiegalcookin.blogspot.com)
You'll need:
1 (16 ounce) bag medium egg noodles
4 - 5 large chicken breasts, thawed
Olive oil
Freshly cracked black pepper
Coarse sea salt
1 cup (2 sticks) butter
2 bricks (8 ounces each) cream cheese
4 t. garlic powder
1 t. garlic salt
3 cups milk
1 1/2 cups grated Parmesan cheese
Start by cooking the chicken with olive oil, pepper, and salt.
Once it is thoroughly cooked, wipe out the skillet and cook the chicken over dry heat until browned on both sides. Chop the chicken and set aside.
Start on the sauce by melting the butter and cream cheese together. Whisk and be sure not to boil. Stir in the garlic powder, garlic salt, and then the milk one cup at a time. Stir between each addition.
Add the Parmesan cheese and some freshly cracked pepper. Heat for a few minutes longer and serve with hot buttered pasta, peas, and the chopped chicken.
Enjoy!
Apple Pinwheels
These little babies pair wonderfully with a large scoop of french vanilla ice-cream! Serve them warm with a little of the hot syrup drizzled over.
You'll need:
2 (8 ounce) containers refrigerated crescent rolls
1/3 cup water
1/3 cup butter
1 cup sugar
1/3 cup sugar
3 cups finely chopped tart apples
1 t. apple pie spice
1/4 t. cinnamon

Start by washing and chopping your apples. Set these aside.

In a saucepan, combine water, butter, and the 1 cup of sugar.

Heat until butter is melted and sugar is dissolved. Set this aside too.

Into your apples, dump the 1/3 cup of sugar, apple pie spice, and cinnamon.

No matter how tempting it is to eat these little babies, resist!! (Yes they taste wonderful and no you can not ask me how I know this!)

Take the two tubes of crescent rolls and flatten them out on a large cleared surface. Pinch the seams together.

Spread the apple mixture over the dough to within 1 inch of the edges.

Gently roll the dough and apples up like you would a log of cinnamon rolls. This is the tricky part as the dough keeps wanting to fall open if not pinched together enough!

Cut the log into 1-inch rolls and place in a large jelly roll pan.

Pour the syrup over the rolls. It will seem like ALOT of syrup, but trust me, it will turn out fine!
Bake at 350* for 40-55 minutes, it just depends on how soon they start turning a golden brown.

Pull out and serve warm with a large scoop of french vanilla ice-cream. They will be rather syrupy, but they will have expanded quite a bit during the baking process so it should be fine.
Enjoy!
Ashleigh
Apple Pinwheels
(prairiegalcookin.blogspot.com)
You'll need:
2 (8 ounce) containers refrigerated crescent rolls
1/3 cup water
1/3 cup butter
1 cup sugar
1/3 cup sugar
3 cups finely chopped tarts apples
1 t. apple pie spice
1/4 t. cinnamon
Bake at 350*
Start by chopping the apples, set aside.
In a large saucepan, combine the butter, 1 cup of sugar, and water. Heat until butter is melted and sugar is dissolved. Set aside.
Combine the apples, 1/3 cup of sugar, apple pie spice, and cinnamon together.
Unroll crescent dough and pinch the seams together.
Spread the apple mixture to within 1-inch of the edge of the dough.
Roll up the dough like you would a log of cinnamon rolls and then slice in 1-inch rolls.
Place in a large jelly roll pan and pour the syrup over them.
Bake for 40-55 minutes or until golden brown.
Serve warm with a large scoop of french vanilla ice-cream.
Enjoy!
Pizza
This is one of my family's favorite meals. We like to use the Chef Boyardee pizza box mixes and then fill the pizza with our favorite toppings. You don't have to use a box mix, but we find it quicker. If you want to make it from scratch, you can substitute a homemade pizza crust and a 8 ounce can of tomato sauce with some Italian seasoning and salt stirred in for the pizza sauce in the kit.
You'll need:
1 Chef Boyardee Pizza Kit
1 lb. ground beef, browned
1 lb. ground sausage, browned
1 onion, chopped
1 green pepper, chopped
1 red pepper, chopped
2 cups cheddar cheese, shredded
2 cups mozzarella cheese, shredded
1/2 of a (7 ounce) package pepperoni
1/2 of a (7 ounce) package Canadian bacon

Make your crust on a pizza pan.

Smother the crust with the pizza sauce (or tomato sauce).

Brown the sausage, ground beef, and onion in a large cast iron skillet.

Evenly spread the meat over the pizza crust. In my family, the guys complain when the meats and veggies don't reach clear to the edges and corners!

Sprinkle the green pepper over the pizza. I would have used red too, but we ran out! (Imagine that!)

Smother the pizza with the cheese. Never be skimpy on cheese or meats!

Layer on the pepperoni. You don't have to use the Canadian bacon and the pepperoni, but it really seems to add to the pizza.

Bake according to the pizza crust instructions and serve in large pieces alongside buttered corn and fresh salad.
Enjoy!
Ashleigh
Copy, Paste, and Print for the recipe below:
Pizza
(prairiegalcookin.blogspot.com)
You'll need:
1 Chef Boyardee Pizza Kit
1 lb. ground beef, browned
1 lb. ground sausage, browned
1 onion, chopped
1 green pepper, chopped
1 red pepper, chopped
2 cups cheddar cheese, shredded
2 cups mozzarella cheese, shredded
1/2 of a (7 ounce) package pepperoni
1/2 of a (7 ounce) package Canadian bacon
Start by making your crust and then smothering it with the pizza sauce (or tomato sauce).
Brown the sausage, ground beef, and onion together in a large cast iron skillet.
Spread the meat over the crust and top with the peppers, cheeses, and pepperoni/bacon.
Bake according to crust instructions and serve alongside buttered corn and a fresh salad.
Enjoy!
Sausage Gravy
Sausage gravy is a staple around our place, it's quick to whip together and it really fills people up!
You'll need:
1 lb sausage
1/3 cup flour
3 cups milk
1/2 t. seasoned salt
1/2 t. salt
1 t. pepper

Brown the sausage and onion together.

Stir in the flour.

Slowly add the milk and stir constantly. It will gradually thicken. (About 10 minutes.)

Add the salts and pepper and stir!

Serve with hot biscuits and fresh fruit.
Enjoy!
Ashleigh
Sausage Gravy
(prairiegalcookin.blogspot.com)
You'll need:
1 lb sausage
1/3 cup flour
3 cups milk
1/2 t. seasoned salt
1/2 t. salt
1 t. pepper
Start by browning the sausage and onions in a large cast iron skillet.
Once browned, stir in the flour.
Slowly pour in the milk and stir constantly until it thickens up (about 10 minutes).
Once thicken, stir in the salts and pepper.
Serve with hot biscuits and fresh fruit.
Enjoy!
Cherry Limeade
I am obsessed with cherry limeade! I love the Sonic version and then I found that the Pioneer Woman has one that taste exactly like Sonic's. I've been making it for awhile now and every time it's a hit.
You'll need:
2 liter bottle lemon-lime pop (Sprite)
1 cup freshly squeezed lime juice (5 - 6 limes)
1 cup sugar
1 (10 ounce) jar maraschino cherries
Thin lime slices

Start by chilling all of the ingredients. Squeeze the limes and pour into a large pitcher.

Pour in the cherries.

Add the sugar and stir together.

Pour in the pop.

Slice a lime into thin slices and add to the pitcher.

Chill.

Serve in glasses with a lime slice and a cherry.
Enjoy!
Ashleigh
Cherry Limeade
(prairiegalcookin.blogspot.com)
You'll need:
2 liter bottle lemon-lime pop (Sprite)
1 cup freshly squeezed lime juice (5 - 6 limes)
1 cup sugar
1 (10 ounce) jar maraschino cherries
Thin lime slices
Start by chilling all of the ingredients.
Combine the lime juice, sugar, and cherries in a large pitcher.
Pour in the pop and garnish with the lime slices.
Chill and enjoy!
Cake Cookies

These cookies are beyond easy and require only three ingredients. Which is why we love 'em so much!
You'll need:
1 funfetti cake mix
2 eggs
1/2 cup oil

Whisk together the oil and eggs in a large bowl.

Add the cake mix.

Drop by rounded teaspoonfuls onto an ungreased cookie sheet. Bake at 350* for 8 - 12 minutes.

Cool and store in an air tight container… If they last that long!
Enjoy!
Ashleigh
Cake Cookies
(prairiegalcookin.blogspot.com)
You'll need:
1 funfetti cake mix
2 eggs
1/2 cup oil
Preheat the oven to 350*
Whisk together the eggs and oil.
Add the cake mix and drop by rounded teaspoonfuls onto an ungreased cookie sheet.
Bake for 8 - 12 minutes.
Cool and store in an air tight container.
Enjoy!
Dark Chocolate Brownies
This is another recipe thanks to the Pioneer Woman. I love it. I've never been much of a dark chocolate person; kinda prefer milk chocolate (or Krackel!) myself. But these actually turned out quite good! Rich and fudge-like. Yummy! You will need a Pepsi or some milk to wash it down with, but if you like chocolate, you will love these brownies!
You'll need:
1 cup butter
5 ounces unsweetened chocolate
1/4 cup cocoa (original or special dark)
2 cups sugar
1 T. vanilla
3 eggs
1 cup flour
3/4 cup semi-sweet chocolate chips
Powdered sugar, for sifting

In a large saucepan, melt the butter and chocolate squares together.


Sprinkle in the cocoa and whisk to combine. Remove from the heat.

Let the mixture sit and cool for about 5 minutes.

Stir in the sugar and vanilla until just combined.

Add the eggs one at a time and mix throughly between each addition.

Dump in the flour and mix until halfway incorporated.

Pour in the chocolate chips and stir together until it's just barely combined and…

Looks like this!

Spread batter evenly into a greased 8 x 8 inch pan (for thick brownies) or a 9 x 13 inch pan (for thinner brownies). Bake at 350* for 40 minutes. Check brownies using toothpick method and return to the oven if they're super doughy/gooey.

Cool completely and then sprinkle with powdered sugar.

Enjoy!
Ashleigh
Dark Chocolate Brownies
(prairiegalcookin.blogspot.com)
You'll need:
1 cup butter
5 ounces unsweetened chocolate
1/4 cup cocoa (original or special dark)
2 cups sugar
1 T. vanilla
3 eggs
1 cup flour
3/4 cup semi-sweet chocolate chips
Powdered sugar, for sifting
Preheat oven to 350*
In a large saucepan, melt the butter and chocolate squares.
Sprinkle in the cocoa, whisk, and remove from heat. Let cool 5 minutes.
Stir in the sugar and vanilla. Add eggs one at a time, whisking between each addition.
Dump in the flour and stir until halfway incorporated. Add the chocolate chips and finish stirring.
Spread batter evenly in a greased 8 x 8 inch pan or a 9 x 13 inch pan.
Bake for 40 minutes or until center isn't gooey.
Cool completely and sprinkle with powdered sugar.
Enjoy!
Pizza Puffs
We were feeling rather bored the other day and so we whipped up these little babies. It turned out to be kinda fun making them and they were a hit with all.
You'll need:
1 (10 biscuits) can biscuits
1 (8 ounce) can tomato sauce
Italian seasoning
3 mozzarella cheese sticks

Start by flattening the biscuits.

Cut your cheese sticks into thirds and place a piece of cheese in the center of each biscuit.

Sprinkle a little Italian seasoning over the cheese. (How much you sprinkle depends on how much seasoning you want to taste.)

Pour a little tomato or pizza sauce over the cheese and seasoning.

Fold the one side of dough over.

And use a fork to crimp the edges. Bake at 450* for 8 - 12 minutes or until golden brown.

Serve while hot with pizza sauce.
Enjoy!
Ashleigh
Pizza Puffs
(prairiegalcookin.blogspot.com)
You'll need:
1 can biscuits
1 can tomato sauce
Italian seasoning
3 mozzarella cheese sticks
Heat over to 450*
Cut cheese sticks in thirds.
Flatten the biscuits and place a piece of cheese in the center, a sprinkle of Italian seasoning, and some tomato sauce.
Fold one side of the dough over and use a fork to crimp the edges.
Cook for 8 - 12 minutes or until golden brown.
Serve with hot pizza sauce.
Enjoy!
Sliced Baked Potato
This is supposed to be a healthier version of french fries… I said supposed to be!
Our Favorite Toppings: (for after you bake it)
Sour Cream
Cheddar Cheese
Chives
Bacon
Cheese Sauce (super simple, 2:1 ratio Velveeta and butter)
Butter
Cream Cheese
Onions (cooked)
You'll need: (for one serving)
1 potato
Butter (or olive oil)
Salt
Pepper
Sour cream
Cheese

Wash and slice your potato width-wise, like this. Don't cut all the way to the bottom, it still has to hold together.

Fill it with butter, salt, and pepper. Microwave for 3 - 4 minutes or until soft. You can also bake it (covered in tin foil) for 50 minutes at 425*

Pull out and smother with sour cream and cheese or your favorite toppings!
Enjoy!
Ashleigh
Sliced Baked Potato
(prairiegalcookin.blogspot.com)
You'll need: (for one serving)
1 potato
Butter
Cheese
Salt
Pepper
Sour cream
Wash and slice a potato width-wise. Slice it almost all the way through, but leave it to where it still holds together.
Fill with butter, (or olive oil), salt, and pepper.
Cover in foil and bake at 425* for 50 minutes or microwave for 3 - 4 minutes.
Pull out and smother with sour cream and cheese or your favorite toppings.
Enjoy!
Our Favorite Toppings: (for after you bake it)
Sour Cream
Cheddar Cheese
Chives
Bacon
Cheese Sauce (super simple, 2:1 ratio Velveeta and butter)
Butter
Cream Cheese
Onions (cooked)
BBQ Bacon Meat Bake
You'll need:
12 slices bacon
2 onion, chopped
4 cloves garlic, minced
2 lb. ground beef
1 cup BBQ sauce
1 cup soft bread crumbs
4 eggs, beaten
2 T. Worcestershire sauce
2 t. Dijon mustard
2 t. dried oregano
1 t. chili powder
6 T. BBQ sauce

Start by frying the bacon in a large skillet. Set it on a paper towel lined plate to drain. Be sure to leave the bacon drippings in the skillet.

Toss the chopped onions and minced garlic into the skillet with the drippings and sauté.

Meanwhile, beat your eggs.

Combine the eggs, onion, garlic, ground beef, 1 cup BBQ sauce, bread crumbs, Worcestershire sauce, Dijon mustard, oregano, and chili powder together in a large bowl using your hands.


Pat the meat mixture into a large 15" roaster and crumble the bacon over the top of the meat. Bake at 375* for 35 - 40 minutes.

While the meat is cooking, chop up some potatoes and fry in the bacon grease from earlier. Stir constantly.

After cooking 35 - 40 minutes, pull the meat out and smother with the 5 tablespoons of BBQ sauce.

Pop the meat back in the oven for another 5 minutes or until cooked through in the center.

By now, your potatoes should be soft but crispy on the edges. Place these little babies in a bowl.


Serve the meat with green beans and fryed potatoes.
Enjoy!
Ashleigh
Copy, Paste, and Print for the recipe below.
BBQ Bacon Meat Bake
(prairiegalcookin.blogspot.com)
You'll need:
12 slices bacon
2 onion, chopped
4 cloves garlic, minced
2 lb. ground beef
1 cup BBQ sauce
1 cup soft bread crumbs
4 eggs, beaten
2 T. Worcestershire sauce
2 t. Dijon mustard
2 t. dried oregano
1 t. chili powder
6 T. BBQ sauce
Preheat the oven to 375*
Fry the bacon in a skillet and then set the bacon on a paper towel lined plate. Keep the drippings in a bowl.
Toss the onion and garlic into the skillet with the drippings to sauté.
Combine in a large bowl the onion, garlic, ground beef, BBQ sauce, bread crumbs, eggs, Worcestershire sauce, Dijon mustard, oregano, and chili powder using your hands.
Pat the meat mixture into a 15" roaster pan and sprinkle with the chopped bacon. Cook for 35 - 40 minutes.
Pull out after 35 minutes and then brush with the 6 tablespoons BBQ sauce and cook another 5 minutes or until cooked through in the center.
Serve with potatoes and green beans and enjoy!
Cream Cheese Stuffed Cinnamon Rolls
This recipe was a pure experiment from the get-go. Some of us liked it, others thought it a bit to soft and sweet. So, after some trial and error, here are some helpful tips:
1. Don't flatten your rolls to be like paper. Let them be about 1/2 inch thick.
2. Lower the oven temperature to 340*.
3. Use less cream cheese spread. About half of the original amount.
These tips will already be implemented below, so enjoy!
You'll need:
2 cans (5 rolls each) Grands cinnamon rolls (with icing)
1/2 block (4 ounces) cream cheese, softened
1/3 cup powdered sugar
1/2 t. vanilla
1/8 t. cinnamon
1/2 T. milk
Dash of salt

Flatten your rolls to about half of their original thickness.

Smoosh five of them (one can) in the bottom of a 9 x 9 inch pan.

Make the cream cheese filling by whipping together the cream cheese, powdered sugar, vanilla, milk, salt, and cinnamon.

Spread this mixture over the cinnamon rolls.

Place the second group of cinnamon rolls on top of the frosting. Bake at 340* for 20 - 25 minutes.

Let them sit for 10 minutes after baking, then pour the icing (from the cans) over them.

Save the middle roll for that member of your family that likes them a bit softer…
Enjoy!
Ashleigh
Copy, Paste, and Print for the recipe below:
Cream Cheese Stuffed Cinnamon Rolls
(prairiegalcookin.blogspot.com)
You'll need:
2 cans (5 rolls each) Grands cinnamon rolls (with icing)
1/2 block (4 ounces) cream cheese, softened
1/3 cup powdered sugar
1/2 t. vanilla
1/8 t. cinnamon
1/2 T. milk
Dash of salt
Flatten the cinnamon rolls to about half of their original thickness. Place five of them in the bottom of a greased 8 x 8 pan.
Make the filling by whipping together the cream cheese, sugar, vanilla, cinnamon, milk, and salt.
Spread over the cinnamon rolls.
Place the other five rolls on top of the filling and bake for 20 - 25 minutes.
Cool for 10 minutes and then frost using the frosting from the cans.
Enjoy!
Best Ever Chocolate Shake
One day, half of the family took off to go to town and run some errands… and of course, that would include stopping by Wendy's for a small frosty or shake. I was part of the half that got left at home (we happened to be quite dirty and there was only so much room in the pickup), so we made our own shakes! Here's what we liked, you can doctor it however you like… Maybe add some bananas or peanut butter, whatever you are craving!
You'll need:
1/4 cup chocolate chips
1 ice cream sandwich
1/2 cup milk
1/2 cup Cool Whip

Start by grinding the chocolate chips up in a Magic Bullet or food processor.

Set aside.

Chop up an ice cream sandwich. Dump it, milk, 3/4 of the ground chocolate chips, and Cool Whip into the Magic Bullet.

Blend together.

Pour into a pretty cup and garnish with a dollop of Cool Whip and some ground chocolate chips.
Enjoy!
Ashleigh
Copy, Paste, and Print for the recipe below:
Best Ever Chocolate Shake
(prairiegalcookin.blogspot.com)
You'll need:
1/4 cup chocolate chips
1 ice cream sandwich
1/2 cup milk
1/2 cup Cool Whip
In a Magic Bullet (or food processor) grind the chocolate chips. Dump into a bowl and set aside.
Chop up an ice cream sandwich and blend with the milk, Cool Whip, and 3/4 of the ground chips in the Magic Bullet.
Pour into a pretty cup and garnish with a dollop of Cool Whip and some ground chocolate chips.
Enjoy!
Shepherd's Pie
This is a great new recipe I got from "The Southern Slow Cooker Bible".
I love the fact that you can throw it together right after lunch and then when you are ready for supper, it's waiting right there!
You'll need:
1 lb, ground beef, browned
1 onion, chopped
2 garlic cloves, minced
2 cups frozen peas
1 cup chicken broth (or stock)
3/4 t. garlic salt (or onion salt)
1/2 t. pepper
1/4 t. cayenne pepper
2 cups Colby or sharp cheddar cheese, shredded
3 cups mashed potatoes
1/2 t. paprika

Wash and chop your potatoes, set these on the stove in a pan full of water to boil.

Brown the beef and onions in a large skillet and then dump into a medium greased crockpot.

Mash your potatoes and set aside.

Dump your peas and the minced garlic on top of the beef.

Pour in the chicken broth.

Sprinkle the garlic salt, pepper, and cayenne pepper. Stir around gently to combine the spices.

Cover it all with the cheese. (If you're a cheese lover, add extra!)

Top with mashed potatoes, paprika, and a little extra cheese. Cover and cook on low for 6 hours, take the lid off in the last 30 minutes of cooking.

I'm sorry for this picture! I learned that there is really no good way to take a picture of Shepherd's Pie, no matter how good it tastes!
Ashleigh
Shepherd's Pie
(prairiegalcookin.blogspot.com)
You'll need:
1 lb, ground beef, browned
1 onion, chopped
2 garlic cloves, minced
2 cups frozen peas
1 cup chicken broth (or stock)
3/4 t. garlic salt (or onion salt)
1/2 t. pepper
1/4 t. cayenne pepper
2 cups Colby or sharp cheddar cheese, shredded
3 cups mashed potatoes
1/2 t. paprika
Brown the ground beef and onion in a large skillet.
Dump into a greased medium crockpot.
Sprinkle the beef with minced garlic and cover with the peas.
Pour in the chicken broth. Top with garlic salt, pepper, and cayenne pepper. Stir gently to combine the spices.
Sprinkle cheese over it all and then top with the mashed potatoes.
Sprinkle paprika over the potatoes and (if you like) top with a little more cheese.
Cover and cook on low for 6 hours, take the lid off in the last 30 minutes of cooking.
Enjoy!
Carrot Cake
This is a simple recipe from an old Betty Crocker cookbook. Carrots are inexpensive and found easily in your local stores. Add that to the facts that this cake stays moist, freezes well, and tastes great and you've got a winner for sure!
You'll need:
1 1/2 cups sugar
1 cup veggie oil
3 eggs
2 cups flour
1 1/2 t. ground cinnamon
1 t. baking soda
1 t. vanilla
1/2 t. salt
1/4 t. ground nutmeg
3 cups carrots, shredded (about five medium)
1 cup coarsely chopped nuts

Start by shredding your carrots. Set them aside with a light tea towel over the bowl.

In a large bowl, combine the sugar, oil, and eggs; beat one minute.

Stir in the flour, cinnamon, baking soda, vanilla, salt, and nutmeg.


Add your carrots and nuts and gently combine. It may seem rather thick and sticky, but this is normal!

Spread evenly into a greased 9 x 13 inch pan and bake at 350* for 35 to 45 minutes or until a toothpick comes out clean. Cool.


Frost with your favorite Cream Cheese Frosting after cooled and store in the fridge.
Enjoy!
Ashleigh
Carrot Cake
(prairiegalcookin.blogspot.com)
You'll need:
1 1/2 cups sugar
1 cup veggie oil
3 eggs
2 cups flour
1 1/2 t. ground cinnamon
1 t. baking soda
1 t. vanilla
1/2 t. salt
1/4 t. ground nutmeg
3 cups carrots, shredded (about five medium)
1 cup coarsely chopped nuts
Heat oven to 350*
In a large bowl, combine the sugar, oil, and eggs. Beat one minute.
Stir in the rest of the ingredients (except for the nuts and carrots).
Gently add the nuts and carrots and pour into a greased 9 x 13 inch pan.
Bake for 35 to 45 minutes or until a toothpick inserted in the center comes out clean.
Cool and frost with your favorite cream cheese frosting.
Enjoy!
Cream Cheese Frosting
You'll need:1 brick (8 ounces) cream cheese, softened
1 T. milk
1 t. vanilla
4 cups powdered sugar
In a medium bowl, beat the cream cheese, milk, and vanilla on low speed.
Gradually beat in the powdered sugar, 1 cup at a time. If needed, you can add a tablespoon more of milk. Use right away or store in the fridge.
Frosts a 9 x 13 inch cake or two 8 or 9 inch cake layers.
Enjoy!
Ashleigh
Potato Cakes
This is a really yummy way to get rid of those leftover mashed potatoes! Quick and filling, it's a favorite around our house.
You'll need:
Leftover mashed potatoes
2 T. butter
Velveeta cheese
Salt
Pepper

Toss the butter in a cast iron skillet and melt.
Start by making a ball of mashed potatoes in your hand, then flatten it and gently drop into the hot skillet.

Add a little salt and pepper and then flip in order to brown it on the other side.

Serve piping hot with a thin slice of Velveeta cheese on top. You can even set the cheese on the cakes while they are in the skillet, just don't flip them over.
Enjoy!
Ashleigh
Copy, Paste, and Print for the recipe below:
Potato Cakes
(prairiegalcookin.blogspot.com)
You'll need:
Leftover mashed potatoes
2 T. butter
Velveeta cheese
Salt
Pepper
Melt the butter in a cast iron skillet.
Make a ball of the mashed potatoes in your hand and then press to flatten into a circle.
Gently drop the cakes into the hot skillet and brown on both sides.
Place a thin slice of Velveeta cheese on the tops of the cakes and serve piping hot.
Enjoy!
Chocolate Chip Cookies
This cookie recipe has been in my family for years and they are the most popular choice for when we are baking.You can add M&M's or peanut butter or just leave them the way they are. Whenever I make these I just triple the batch; now that's a lot of stirring! I've found that they don't taste right when mixed in a mixer, so for best results mix by hand.
You'll need:
2 1/4 cups unsifted flour
1 t. baking soda
1 t. salt
1 cup butter, softened
3/4 cup sugar
3/4 cup brown sugar
1 t. vanilla extract
2 large eggs
2 cups semi-sweet chocolate chips

Start by stirring together the flour, baking soda, and salt. Set this aside.

Now in a larger bowl, combine the sugar, brown sugar, butter, and vanilla.

Dump in the eggs. As you can see here, I was making a triple batch and using goose eggs.

One of them actually happened to be a double yolker! (That sounded dorky, I know.)

Whip this mixture together. By now, you should be a little sore in your arm, but just wait! The best is yet to come!!

Gradually dump in the flour. I like to dump in a third at a time. Seems to work nicely!

Now your arm should be hurting…

Add your chocolate chips and stir…


Drop cookie balls onto an ungreased cookie sheet and bake at 375* for 8 - 10 minutes or until golden brown. After you pull them out of the oven, you can set them on the stove top for a few minutes to finish cooking in the center.

Cool on wire racks and store in the freezer. Enjoy!
Ashleigh
Copy, Paste, and Print for the recipe below.
Chocolate Chip Cookies
(prairiegalcookin.blogspot.com)
You'll need:
2 1/4 cups unsifted flour
1 t. baking soda
1 t. salt
1 cup butter, softened
3/4 cup sugar
3/4 cup brown sugar
1 t. vanilla extract
2 large eggs
2 cups semi-sweet chocolate chips
Preheat oven to 375*
Combine flour, soda and salt in a large bowl.
In a larger bowl, cream butter, sugars, vanilla, and add eggs.
Gradually, add in the flour mixture.
Stir in chocolate chips.
Drop rounded teaspoonfuls on ungreased cookie sheet.
Bake 8-10 minutes.
Enjoy!
Wacky Cake
This recipe came from Cook's Country and here's a little history behind this cake: During the First World War, butter, eggs, sugar, and milk were often hard to come by, so women improvised and created these "make-do" cakes. Since the cake doesn't have any eggs, it relies on the last minute reaction between the baking soda and vinegar to help the thick batter lift. Be sure not to over mix it, leave just a few streaks of flour in the batter. Also don't try mixing in another bowl and then dumping the batter in the pan, the reaction between the vinegar and baking soda doesn't last that long, so it needs mixed in the pan and then quickly popped into the oven.
You'll need:
1 1/2 cups flour
3/4 cup sugar
1/4 cup cocoa
3/4 t. baking soda
1/2 t. salt
5 T. veggie oil
1 T white vinegar
1 t. vanilla
1 cup water

In a lightly greased 8 x 8 inch pan, combine the flour, sugar, cocoa, baking soda, and salt.

Once mixed, dig three wells in the mix. One large and two small holes.

In the largest hole, pour the oil. Pour the vanilla in one of the small holes and then the vinegar in the other small hole.

Then pour the water over all of that.

Stir together gently. Don't over mix, you'll want a few streaks left in the batter (I mixed a little to thoroughly!)

Bake at 350* for 30 minutes or until a toothpick comes out of the center clean.

Sprinkle with powdered sugar once cooled and serve with whipped topping.
Enjoy!
Ashleigh
Copy, Paste, and Print for the recipe below.
Wacky Cake
(prairiegalcookin.blogspot.com)
You'll need:
1 1/2 cups flour
3/4 cup sugar
1/4 cup cocoa
3/4 t. baking soda
1/2 t. salt
5 T. veggie oil
1 T white vinegar
1 t. vanilla
1 cup water
Preheat the oven to 350* and grease a 8 x 8 inch pan.
In the pan, combine the flour, sugar, cocoa, baking soda, and salt. Dig three holes, one large and two small.
In the large hole, add the veggie oil. In one small hole, add the vinegar and in the other the vanilla.
Pour the water over that and then stir until mostly combined with a few streaks left.
Bake for 30 minutes or until a toothpick comes out clean.
Cool, sprinkle with powdered sugar, and then serve with whipped topping.
Enjoy!
Homemade Granola Bars
You'll need:
1/2 cup brown sugar
1 1/2 cups honey
1/3 cup veggie oil
1/4 t. salt
1 cup crunchy peanut butter
2 t. vanilla
4 cups crisped rice cereal
2 2/3 cups old fashioned oats
2/3 cups ground flax seed (I used golden milled flax seed)
1 cups mini chocolate chips

Dump your oats in a large bowl.

Add the cereal…

Then add the ground flax seed and gently stir to combine.


In a medium saucepan over low flame, dump the brown sugar…

Then the honey..

And then add the oil and sea salt.


Bring this mixture to a boil and boil for 1 minute.

Take the pan off of the heat and then add the peanut butter and vanilla. Yummy!


Add this to the oats mixture and stir together.

Let this sit and cool off for 5-8 minutes.

Meanwhile, cut a piece of wax paper to fit a large cookie sheet.

Dump the granola onto the cookie sheet and flatten it out.


One idea is if you lay another piece of waxed paper over the granola, you can use a cookie sheet to flatten the granola out.

Once flat, sprinkle the chocolate chips evenly over the granola.

Use the cookie sheet and gently press the chips into the granola.

Cool completely in the fridge and then cut into the size of bars you want.

Wrap them individually in plastic wrap and then stick in a larger freezer bag. Pop them in the freezer and grab for when you're on the go!
Enjoy!
Ashleigh
Copy, Paste, and Print for the recipe below:
Homemade Granola Bars
(prairiegalcookin.blogspot.com)
You'll need:
1/2 cup brown sugar
1 1/2 cups honey
1/3 cup veggie oil
1/4 t. salt
1 cup crunchy peanut butter
2 t. vanilla
4 cups crisped rice cereal
2 2/3 cups old fashioned oats
2/3 cups ground flax seed (I used golden milled flax seed)
1 cups mini chocolate chips
In a large bowl, combine the rice cereal, oats, and flax seed. Set aside.
In a medium saucepan over low heat, bring to a boil the brown sugar, honey, oil, and salt. Boil 1 minute and then remove from the heat. Stir in the peanut butter and vanilla.
Dump this into the oat mixture, gently stir, and then let cool for 5-8 minutes.
Cut a piece of waxed paper to fit a large cookie sheet and then spread out the granola on it using another piece of waxed paper and a cookie sheet set on top of it.
Sprinkle the chocolate chips evenly over it and then set in the fridge to cool.
Once cooled, cut into bars (whatever size you want), wrap in plastic wrap (individually) and then freeze in a large freezer bag.
Enjoy!
Teriyaki Chicken
For me, Teriyaki Chicken was a first. I love to eat the stuff, but have never tried making it. So instead of finding a simple basic recipe to start off with, I glanced at 3 or 4 different ones and took off from there. This recipe is totally mine, very simple, very easy, and extremely tasty!
Marinade:
1/3 cup soy sauce
1/2 cup mayonnaise
1 clove garlic
1/4 t. ground ginger
Chicken:
3 lg. chicken breasts, thawed
Olive oil
Fresh cracked black pepper

Start by slicing the chicken. Set this aside.

In a large bowl, combine the soy sauce, mayonnaise, garlic and ginger.

Whisk together thoroughly and then pour into a large plastic bag.

Add the chicken and coated thoroughly. Let this sit in the fridge for at least 1 hour. (Mine ended up sitting for over 24 hours, but still tasted great!)

Once the chicken has finished marinating, toss a little olive oil and freshly cracked black pepper into a large skillet over medium flame.

Add the chicken and cook. Flip it once it's a deep brown and crispy on one side. It should be somewhat blackened, but still juicy. Once you think it might be done, simply cut one of the largest pieces in half to check it.

Serve with hot rice and mixed Asian veggies.
Enjoy!
Ashleigh
Copy, Paste, and Print for the recipe below:
Teriyaki Chicken
(prairiegalcookin.blogspot.com)
Marinade:
1/3 cup soy sauce
1/2 cup mayonnaise
1 clove garlic
1/4 t. ground ginger
Chicken:
3 lg. chicken breasts, thawed
Olive oil
Fresh cracked black pepper
Combine the ingredients for the marinade in a large bowl.
Cut the chicken in 1/2 inch strips and combine with the marinade in a large plastic bag.
Let this sit in the fridge for at least 1 hour.
When ready to cook, drop some olive oil and pepper into a large skillet over medium flame.
Add the chicken and cook until sides are somewhat blackened and center is done. Flip halfway through.
Serve with mixed Asian veggies and hot rice.
Enjoy!
Buffalo Chicken Bites
I personally love these chicken bites! They do take awhile and there is the possibility of being slapped with a little hot oil… But in the end, they're worth it! (Recipe from the PioneerWoman)
Couple little tips: 1. If you don't have any beer handy, I found that Pepsi or Sprite works well too.
2. I used Louisiana Hot Wing Sauce, so anything along the lines of wing sauce or pepper sauce works.
Chicken Bites:
1 cup flour
1 T. cornstarch
1 t. salt
1 (12 ounce) can of beer
2 pounds boneless, skinless chicken breasts
Sauce:
1 cup (2 sticks) butter
One (12 ounce) bottle cayenne pepper sauce (Frank's or Louisiana work)
3 - 4 dashes hot sauce (I used Tabasco)
3 - 4 dashes Worcestershire sauce
In a heavy pot, heat 3 - 4 inches of oil to around 350*.

In a large bowl, combine the flour, cornstarch, and salt.


Pour in the beer or Pepsi while stirring. Set this aside.

Chut up the chicken into 1-inch pieces…

And drop into the batter. Stir around until they're throughly coated.

Meanwhile, check on your oil.

Once it's hot, drop some of the battered chicken into it. Give them 3 - 4 minutes to cook through and come to a deep rich brown.

Pull them out and set on a paper towel lined cookie sheet to drain. Repeat the process until all of the chicken has been cooked. At this point, if you're feeding little ones, set some of the cooked chicken bites aside without the sauce.

Now, to make the sauce. In a medium saucepan, melt the butter.

Pour in the wing sauce, hot sauce, and Worcestershire sauce.

Whisk together and heat through.

Mix the chicken bites and sauce together in a large bowl.

Coat the chicken.

Then dump the chicken onto the cookie sheet (after the towels are removed) and bake at 325* for 5 - 10 minutes or until the sauce has set up on the chicken somewhat.

Serve with celery, carrots, and the Blue Cheese Dip.
Enjoy!
Ashleigh
Copy, Paste, and Print for the recipe below:
Buffalo Chicken Bites
(prairiegalcookin.blogspot.com)
Chicken Bites:
1 cup flour
1 T. cornstarch
1 t. salt
1 (12 ounce) can of beer (or Pepsi)
2 pounds boneless, skinless chicken breasts
Sauce:
1 cup (2 sticks) butter
One (12 ounce) bottle cayenne pepper sauce (Frank's or Louisiana work)
3 - 4 dashes hot sauce (I used Tabasco)
3 - 4 dashes Worcestershire sauce
Preheat the oven to 325*. Heat 3 - 4 inches of oil in a heavy pan to 350*.
Chop up the chicken into 1-inch chunks and set aside.
To make the batter, mix the flour, cornstarch, and salt in a large bowl. Slowly pour in the beer (or Pepsi) while stirring.
Drop chunks of chicken into the batter, coat throughly, and then gently place the batch into the hot oil.
Cook the chicken through and pull it out when it's a deep golden brown. Place onto a paper towel lined cookie sheet. Continue until all the chicken batches are cooked.
To make the sauce, combine all the ingredients in a medium saucepan and whisk until melted.
Toss the chicken and sauce in a bowl and then dump onto the cookie sheet (after towels are removed).
Bake for 5 - 10 minutes. Serve with celery, carrots, and Blue Cheese Dip.
Enjoy!
Blue Cheese Dip
This is the dip that goes alongside the Buffalo Chicken Bites. It's super quick, easy and delish. You'll catch yourself dipping little bites of chicken or veggies into it while it's chilling in the fridge. Trust me, you won't wait till the meal!
One little tip for the buttermilk: If you don't have any on hand (which I never do!), just mix 1/2 cup milk with 1/2 T of vinegar.
You'll need:
1 cup mayonnaise
1/2 cup sour cream
5 ounces crumbled blue cheese
3 - 4 dashes Worcestershire sauce
1/4 t. salt
1/4 t. pepper
1/2 cup buttermilk

Dump the mayo in a large bowl. Lick the spatula. (Yes, this is mandatory.)

Add the sour cream.

Then the blue cheese.

Toss in the Worcestershire sauce, salt, pepper, and buttermilk. Whisk together and chill!

Now, I know this will be hard, but save a little for the family (or friends). Don't eat it all before the meal. (Your stomach will thank me for that advice!)
Ashleigh
Copy, Paste, and Print for recipe below:
Blue Cheese Dip
(prairiegalcookin.blogspot.com)
You'll need:
1 cup mayonnaise
1/2 cup sour cream
5 ounces crumbled blue cheese
3 - 4 dashes Worcestershire sauce
1/4 t. salt
1/4 t. pepper
1/2 cup buttermilk
In a large bowl, combine all ingredients and chill in the fridge for 2 - 3 hours or serve right away!
Lemon Blueberry Streusel Muffins
These muffins combine two of my favorite flavors: lemon and blueberries. But first, a few tips: 1. Use fresh blueberries or frozen blueberries that have been washed and thawed. 2. Don't add extra liquid to the streusel, the muffins ended up being VERY oily and soft. So even if the topping doesn't seem to mix and clump up much, it's fine. 3. If you like for the muffins to have a more distinct lemon flavor and less sweetness, use the zest of two lemons instead of just one.
Muffins:
1 1/2 cups flour
3/4 cup sugar
2 t. baking powder
1/4 t. salt
Zest of 1 lemon
1/3 cup veggie oil
1 egg
1/3 cup milk
2 cups blueberries
Streusel Topping:
1/2 cup sugar
1/2 cup flour
1/4 cup butter, cold
1 t. cinnamon

Start by mixing the flour, sugar, salt, baking powder, and zest in a bowl.

Set aside.

In another bowl, dump your blueberries (thawed and washed or fresh) and add a spoonful of the flour mix. This helps them to keep from falling to the bottom of the batter.

Gently toss (don't really toss them, but you know what I mean!)

In another bowl, combine the veggie oil, egg, and milk.

Add the flour mixture to the liquid and gently stir until just moistened. Don't over mix!

Add the blueberries and fold together.

Drop into greased or lined cupcake pans and set aside.

Now, for the streusel, combine the sugar, flour, butter, and cinnamon.

Mix until it looks similar to this.

Drop the streusel onto the muffin batter and bake at 400* for 20 minutes.

Pull out, cool and enjoy!
Ashleigh
Copy, Paste, and Print for the recipe below:
Lemon Blueberry Streusel Muffins
(prairiegalcookin.blogspot.com)
Muffins:
1 1/2 cups flour
3/4 cup sugar
2 t. baking powder
1/4 t. salt
Zest of 1 lemon
1/3 cup veggie oil
1 egg
1/3 cup milk
2 cups blueberries
Streusel Topping:
1/2 cup sugar
1/2 cup flour
1/4 cup butter, cold
1 t. cinnamon
Preheat the oven to 400*
In a large bowl, combine the flour, sugar, baking powder, salt, and zest.
In another bowl, dump the blueberries and add a spoonful of the flour mixture. Gently stir.
In yet another bowl, mix the oil, egg, and milk. Combine with the flour mixture. Gently fold in blueberries.
In your last bowl, make the streusel by combining the sugar, flour, butter, and cinnamon.
Drop the muffin batter into a greased or lined muffin pan and top with the streusel.
Bake for 20 minutes. Cool and store in an air-tight container.
Enjoy!
Peanut Butter Chocolate Chip Muffins
What's better then peanut butter + chocolate? Not much, my friend. Which is why these muffins are so good! Try 'em and find out!
You'll need:
2 1/4 cups flour
2 T. baking powder
1/2 t. salt
2/3 cup brown sugar
6 T. butter
3/4 cup peanut butter
2 eggs
1 cup milk
3/4 cup mini chocolate chips

Start by mixing the flour, baking powder, salt and brown sugar.

Set aside.

Melt the butter and dump into another bowl.

Add the peanut butter.

Then the eggs and milk, mix well!

Once well blended, pour in with the flour mixture. Gently stir together.

Dump in the chocolate chips and fold gently.

Drop into lined (or greased) muffin tins and bake at 375* for 17 - 20 minutes. Use the toothpick method to see if they're done.

Cool and enjoy!
Ashleigh
Copy, Paste, and Print for the recipe below.
Peanut Butter Chocolate Chip Muffins
(prairiegalcookin.blogspot.com)
You'll need:
2 1/4 cups flour
2 T. baking powder
1/2 t. salt
2/3 cup brown sugar
6 T. butter
3/4 cup peanut butter
2 eggs
1 cup milk
3/4 cup mini chocolate chips
Preheat oven to 375*
In a large bowl, combine the flour, baking powder, salt and brown sugar. Set aside.
In another bowl, mix the butter, peanut butter, eggs, and milk. There will still be some lumps from the peanut butter, but that's fine!
Combine the liquid mixture with the flour mix and then gently fold in chocolate chips.
Drop into greased or lined muffin tins and bake for 17 - 20 minutes or until a toothpick come out clean.
Cool and enjoy!
French Breakfast Puffs
This is another recipe thanks to PW (Pioneer Woman). It works great for a quick grab n go kinda breakfast or even a mid-afternoon snack!

You'll need:
3 cups flour
3 t. baking powder
1 t. salt
1/2 t. ground nutmeg
1 cup sugar
2/3 cup shortening (Crisco)
2 eggs
1 cup milk
1 1/2 cup sugar
3 t. cinnamon
2 1/2 sticks butter

Start by mixing the flour, baking powder, salt, and nutmeg. You can go ahead and set this aside.

In another bowl, mix the sugar and shortening.

Beat in the eggs.

Then alternate between adding 1/4 of the milk….

And 1/4 of the flour. Gently stirring between each addition.


Drop into greased muffin pans and bake at 350* for 15 - 20 minutes.

While they're baking, stir together the sugar and cinnamon.

I love the look of partly swirled cinnamon sugar!!

Melt your butter…

Pull out the muffins. Don't cool them!!

Quickly drop the muffins in the butter.

And then roll it in the sugar mix. Never skimp on the sugar. Or the butter for that matter.


Cool on a rack and store in an air-tight container.
Enjoy!
Ashleigh
Copy, Paste, and Print for the recipe below.
French Breakfast Puffs
(prairiegalcookin.blogspot.com)
You'll need:
3 cups flour
3 t. baking powder
1 t. salt
1/2 t. ground nutmeg
1 cup sugar
2/3 cup shortening (Crisco)
2 eggs
1 cup milk
1 1/2 cup sugar
3 t. cinnamon
2 1/2 sticks butter
Preheat the oven to 350*
Start by mixing the flour, baking powder, salt, and nutmeg. Set aside.
In a very large bowl, mix the sugar and shortening. Add the eggs and beat well.
Then alternate between adding 1/4 of the milk, stirring, and then adding 1/4 of the flour mixture. Continue this until it's all mixed together.
Bake for 15 - 20 minutes. While they're baking, melt the butter and then (in a separate bowl) mix the 1 1/2 cups of sugar and cinnamon.
Once muffins are done, drop the one by one into the butter and then roll in the sugar mixture.
Cool and store in an airtight container. Enjoy!
Slow-Cooker Santa Fe Soup
This soup is great and quite a hit with our family. It originally seemed rather basic and bland. But I've tweaked it and now it has an immense depth of flavor. No wonder it's called the Santa Fe Soup! And for those of you that are curious about the Santa Fe Trail, here's a little history lesson.
In 1821, the Santa Fe Trail was basically the first great highway and for nearly 60 years after, it was one of the nation's greatest routes for adventure and western expansion until the railroad to Santa Fe came in 1880. The trail went through Comancheria (a region of New Mexico, west of Texas, owned by the Comanches) and for allowing the travelers to go throughout their territory, the Comanches demanded a fee in return. When the settlers started regularly assaulting the Comanches (upset they had to pay a fee), the Comanches fled the area. The trail was 900 miles long and went through arid plains, desert, and mountains. On the Santa Fe (unlike the Oregon trail) there was a high risk of Native American attacks as neither the Comanches or Apaches tolerated trespassers. Not only that, but lack of food and water, unpredictable weather, and rattlesnakes made taking the trail very dangerous.
But I suppose you came here to see the soup. Not to rehash your American history!
You'll need:
1/2 lime
1 onion, chopped
Freshly cracked black pepper
Course sea salt
1 lb. ground beef
1/4 t. liquid smoke
1 lb. Velveeta cheese, cubed
1 can (15 ounces) corn, undrained
1 can (15 ounces) red kidney beans, undrained
1 can (10 ounces) Rotel Original
1 can (15 ounces) stewed tomatoes
2 T. dry taco seasoning (I like to use Homemade Taco Seasoning)

Start with the chopped onion in a skillet. Juice your lime and pour half of the juice in with the onion. Stir it around over a low flame and then add some salt and pepper. Keep stirring. As soon as it looks like the lime is all cooked out and the bottom of the skillet is dry, add the rest of the lime juice. Keep stirring and if you feel like it, you can add some more salt and pepper.

Once the onions have sautéed with the lime, add the liquid smoke and beef. Brown it.

After the meat is done, you can dump the cheese, beef, corn, beans, Rotel, and tomatoes in a large crockpot. Gently stir it together.

Sprinkle in the taco seasoning and stir it. Cook on high for 3 hours or low for 5 - 6 hours. If you cook it on low, it helps to shut it off after the first 3 1/2 hours and let it sit for 30 minutes before turning it back to low.

Serve with thick slices of hot, homemade bread and enjoy!
Copy, Paste, and Print for the recipe below:
Slow-Cooker Santa Fe Soup
(prairiegalcookin.blogspot.com)
You'll need:
1/2 lime
1 onion, chopped
Freshly cracked black pepper
Course sea salt
1 lb. ground beef
1/4 t. liquid smoke
1 lb. Velveeta cheese, cubed
1 can (15 ounces) corn, undrained
1 can (15 ounces) red kidney beans, undrained
1 can (10 ounces) Rotel Original
1 can (15 ounces) stewed tomatoes
2 T. dry taco seasoning (I like to use Homemade Taco Seasoning)
Saute the onion with half of the lime juice. When skillet looks dry, add the rest of the lime juice, salt, and pepper.
Brown the meat with the onion and then stir in the liquid smoke.
In a large crockpot, mix the beef, cheese, corn, beans, Rotel, tomatoes, and taco seasoning.
Cook on high for 3 hours or on low for 5 - 6 hours. If cooking on low, at 3 1/2 hours turn off for 30 minutes and then finish cooking.
Enjoy!
Skinny Chocolate Oatmeal Muffins
As I sit here writing this, I'm snarfing down a couple of muffins (with a tall glass of milk, of course.) and I've got Kenny Loggins cranked. Life is good!!
But anyway, that was not the point of posting tonight. I wanted to share a (super yummy!) recipe for Skinny Chocolate Oatmeal Muffins. These are actually healthy chocolate muffins! Er. Ah, I mean about as healthy as chocolate muffins can be. I made a double batch and got around 50 muffins. Not that there's that many left on our kitchen table by now…
The following recipe is only for a single batch, so triple away if you want!
The following recipe is only for a single batch, so triple away if you want!
You'll need:
1/2 cup sugar
1/2 cup honey
1 lg. egg
3/4 cup natural (unsweetened) applesauce
3/4 cup sour-cream
1/2 cup all-purpose flour (or you can use 1 cup of regular flour and forget the whole wheat if you don't have any)
1/2 cup whole wheat flour
1/2 t. salt
1/2 cup cocoa powder
1 t. baking soda
1 t. baking powder
1 t. baking soda
1 t. baking powder
1 cup old fashioned oats
1/2 cup chocolate chips

Start by greasing some cupcake pans. Don't use liners! These muffins will stick to them badly.
Then in a large (almost huge) bowl, mix the honey and sugar.

Add the egg and mix some more...

Then add the applesauce and sour cream. Even if you mix really good, there'll still be some little white lumps. Don't worry about 'em!

Then stir in the flour.

Add your cocoa, baking soda, baking powder, and salt.

Gently fold in the oats and chocolate chips.

Fill greased muffin tins 3/4 full and bake at 425* for 5 minutes. Then drop the temperature down to 375* and bake for another 12 minutes.

Pull 'em out and use the toothpick method to see if they're done. Push a toothpick into the center of the muffin...

Pull it out and if it's clean they're done!

Cool for a few minutes and then enjoy with some milk and 80's rock music!
Ashleigh
Copy, Paste, and Print for the recipe below.
Skinny Chocolate Oatmeal Muffins
(prairiegalcookin.blogspot.com)
You'll need:
1/2 cup sugar
1/2 cup honey
1 lg. egg
3/4 cup natural (unsweetened) applesauce
3/4 cup sour-cream
1/2 cup all-purpose flour (or you can use 1 cup of regular flour and forget the whole wheat if you don't have any)
1/2 cup whole wheat flour
1/2 t. salt
1/2 cup cocoa powder
1 t. baking soda
1 t. baking powder
1 t. baking soda
1 t. baking powder
1 cup old fashioned oats
1/2 cup chocolate chips
Preheat the oven to 425* and grease a couple of muffin tins with nonstick spray.
In a very large bowl, combine the honey and sugar. After mixing well, add the egg. Mix that as well and then add the sour cream and applesauce. Don't worry if there are a few lumps!
Mix in the flour(s). Then add the cocoa, baking soda, baking powder, and salt.
Once mixed, fold in the oats and chocolate chips.
Fill the muffin tins 3/4 full and bake at 425* for 5 minutes. Then drop the temperature down to 375* for 12 minutes.
Pull out, cool and enjoy!
Spicy Noodle N Beef Casserole
This yummy recipe was originally from Cathy M (Thank You!) I've doctored it a little more and here's how it ended up! It used to be twice this size, but we found that it was a bit too much for our crew! (If you want to, you can easily double it.)
You'll need:
1/2 cup onion, chopped finely
1 (8 ounce) can tomato sauce
1 can Rotel Original
1/2 cup milk
1/2 can mushroom soup
1/2 cup Velveeta cheese
1 (8 ounce) bag of wide egg noodles

Set your water to boil and get the noodles going. Then start by adding the chopped onion and ground beef to a skillet. Brown the meat…

Once browned, add the tomato sauce. Simmer for about 2 - 3 minutes.

Then add the Rotel. Inhale deeply!

In a separate saucepan, mix the cheese, soup, and milk. Whisk these together and heat.

Now that your meat mixture is done.

And the noodles.

Stir together in a small casserole dish and then pour over it the cheese mixture. Bake at 375* for about 30 minutes.

Pull out and serve alongside a nice pile of corn!
Enjoy,
Ashleigh
Spicy Noodle N Beef Casserole
(prairiegalcookin.blogspot.com)
You'll need:
1/2 cup onion, chopped finely
1 (8 ounce) can tomato sauce
1 can Rotel Original
1/2 cup milk
1/2 can mushroom soup
1/2 cup Velveeta cheese
1 (8 ounce) bag of wide egg noodles
Preheat the oven to 375*.
Start cooking the noodles. Dump the onion and beef into a skillet.
Brown the beef and then add the tomato sauce. Simmer 2 - 3 minutes and then add the Rotel.
Meanwhile, in a small saucepan, whisk and heat together the milk, soup, and cheese.
Once the beef mixture is heated, the noodles are done, and the soup mixture is heated through, mix together in a casserole dish.
Cook for 30 minutes and serve with corn and salad!
I've tried making croutons before and they never turned out quite right. They were always oily and soft. Thankfully, after some trial and error, I've figured it out! One of the most important factors is the oven. Before when I made them, I would just brown them in a non-stick skillet with LOTS of butter. Turns out (much to my surprise!) there is such a thing as too much butter! What you need for these babies is "dry heat". I better just show you what I mean...
You'll need (for a small batch like mine):
3 slices of bread (I used Oatnut)
2 T butter
1 lg. garlic clove, minced
Freshly cracked black pepper

Preheat your oven to 350*.
Then get started with your bread and a bread knife.

Cut it in strips (about 1 inch apart).

And then again across the other way.

Toss the chunks in a large cast iron skillet.
(Yes, it does have to be cast iron.. Trust me, they'll be worth the seasoning and such later.)
Shut off the oven and stick the skillet in it for about 10 minutes. This will dry the bread out and make it easier to brown.

Pull them out, add the butter, and then turn on a medium - low flame .

Mince the garlic.

Toss that garlic in and then crack some pepper.

Keep stirring these! By now, the butter is probably gone, so they will burn fairly easy.
This is what I call "dry heat", there's no liquid or grease. Just heat and the bread.
Once they get to the color and crispness you want them, stick them back in the oven (it'll feel cooler now, but the heat from the cast iron skillet will warm it back up some.) and leave them sit for about 5 - 7 minutes. This finishes the drying out process, without browning/burning them any more.

Pull out and enjoy alongside a leafy salad!
Ashleigh
Copy, Paste, and Print for the recipe below.
Homemade Croutons
(prairiegalcookin.blogspot.com)
You'll need (for a small batch like mine):
3 slices of bread (I used Oatnut)
2 T butter
1 lg. garlic clove, minced
Freshly cracked black pepper
Preheat the oven to 350* and then shut it off.
Chop your bread into chunks and then place them in a cast iron skillet and then in the oven for 10 minutes.
Pull it out and add the butter, garlic, and pepper. Stir constantly over medium flame. Keep stirring until it reaches the color and crispness you want and then place the skillet back in the oven for about 5 minutes.
Pull out and enjoy with a nice salad!
These are sooo bad for you, but so good! Really not something to eat very often, but once every ten years should be fine. Maybe even less than that??
You'll need:
2 cans biscuits
1 lb. Velvetta cheese
1/3 cup butter, melted

Pour half of the butter into a round cake pan. Then follow the steps up above. Flatten the dough, place on a piece of cheese, and roll into a ball. You might end up not using all of the cheese.

Plop all of the balls into the cake pan…

Pour the other half of butter on them, sprinkle on a little paprika (if you want!), and bake at 350* for 20 minutes.

Serve with tomato soup and/or fresh fruits and veggies to help off set the bad!
Ashleigh
Copy, Paste, and Print for the recipe below.
Pull Apart Cheese Thingies
(prairiegalcookin.blogspot.com)
You'll need:
2 cans biscuits
1 lb. Velvetta cheese
1/3 cup butter, melted
Preheat the oven to 350*.
Flatten the biscuits, place a piece of cheese in the center, and then roll them into a ball.
Place them all in a deep glass pan (it should have half of the butter poured into the bottom) and then pour the rest of the butter over the top.
Cook for around 20 minutes or until they are golden brown.
Serve with some fresh fruits and veggies (finger foods!).
Super yummy and simple, this cake is great for most any gathering you have! The pecans and pumpkin go together perfectly and give it a variety of fall flavors (Yes, I know, it's not fall. But I still had to post this!) Have fun!
You'll need:
1 (16 oz. can) pumpkin
1 (12 oz. can) evaporated milk
1 1/2 cup sugar
1 t. salt
2 t. pumpkin pie spice
3 eggs
1 yellow cake mix
1 cup butter
1 cup pecans

Start by mixing the pumpkin, milk, sugar, salt, pumpkin pie spice, and eggs. Mix well!

Pour into a greased 9x13 inch pan.

Sprinkle the cake mix evenly over the pumpkin mixture.

Then top with the pecans.

Evenly pour the butter all over the pecans and cake mix. Don't stir any!

Now it won't be very pretty at this point, lots of bubbles and lumps.. But that's okay!
Bake it at 350* for 45 minutes or until golden brown on top.

Pull out and let it sit for 5 - 10 minutes. Or you can cool it completely. Enjoy!
Ashleigh
Copy, Paste, and Print for the recipe below.
Pumpkin Pecan Cake
(prairiegalcookin.blogspot.com)
You'll need:
1 (16 oz. can) pumpkin
1 (12 oz. can) evaporated milk
1 1/2 cup sugar
1 t. salt
2 t. pumpkin pie spice
3 eggs
1 yellow cake mix
1 cup butter
1 cup pecans
Preheat the oven to 350*.
Start by mixing the pumpkin, milk, sugar, salt, pumpkin pie spice, and eggs. Mix well!
Pour into a greased 9x13" pan.
Sprinkle the cake mix evenly over the top.
Then top with the pecans.
Pour over the butter (evenly).
Now bake it for 45 minutes or until golden brown on the top.
Pull out and let sit for 5 - 10 minutes. Cut and serve!
This Frittata was incredibly easy to make. It's basically glorified baked eggs. Quite yummy! I made a small pan and it fed about three people, so if you're feeding more you'll want to at least double if not triple this recipe.
You'll need:
3 eggs
1/2 green pepper
1/2 red pepper
1/2 onion
1/2 cup finely grated longhorn cheddar (or any other kind of cheese you like)
3/4 - 1 cup milk
5 - 6 green olives
Salt
Pepper

Start by pouring a little olive oil in a small cast iron skillet.

Add some sliced onion.

Sliced red pepper.

And then some sliced green pepper.

Sprinkle on some salt and pepper and then cook over medium heat. Don't cook them completely through. They still need some crunch.

Meanwhile, in a large bowl, whisk the eggs (just break the yolks and stir together a little bit. Don't beat them!), milk, and cheese. Pour over the veggies and then do not stir! Just leave it be....

Slice the olives lengthwise and place them on top of the frittata.

Over medium - high heat, cook it until you can pull the edges away from the sides of the skillet. They should be a dark brown, but not crispy. It will still be runny in the center of the frittata. Now, bake it at 375* for 10 - 15 minutes or until it starts to brown on the top and is no longer runny.

Let sit on the stove for 1 - 2 minutes to finish cooking and then slice n serve!

Enjoy!
Ashleigh
Frittata
(prairiegalcookin.blogspot.com)
You'll need:
3 eggs
1/2 green pepper
1/2 red pepper
1/2 onion
1/2 cup finely grated longhorn cheddar (or any other kind of cheese you like)
3/4 - 1 cup milk
5 - 6 green olives, sliced
Salt
Pepper
Preheat the oven to 350*.
Start by slicing the onions and peppers. Place in a small oven proof skillet with a bit of olive oil, salt, and pepper.
Saute until they're halfway cooked. They still need some crunch.
In a medium bowl, mix the eggs, milk, and cheese.
Pour over the peppers and onions. Do not stir! Let it sit over medium - low flame until the edges start pulling away from the sides of the skillet.
Top with the olives and place in the oven for 10 - 15 minutes or until golden on the top and no longer runny.
Pull out and let sit 1 - 2 minutes and then slice n serve!
White Mexican Chili
This recipe was thanks to Pinterest. It turned out great! We loved the cream cheese and chicken together. Add the flavor of the Rotel and it's quite a chili!
You'll need:
2 chicken breasts (still frozen)
1 can Rotel (Original)
1 can corn kernels
1 can black beans (I used soy)
1 pkg. Ranch dressing mix
1 T. ground cumin
1 t. chili powder
1 t. onion powder
1 8 oz. brick cream cheese
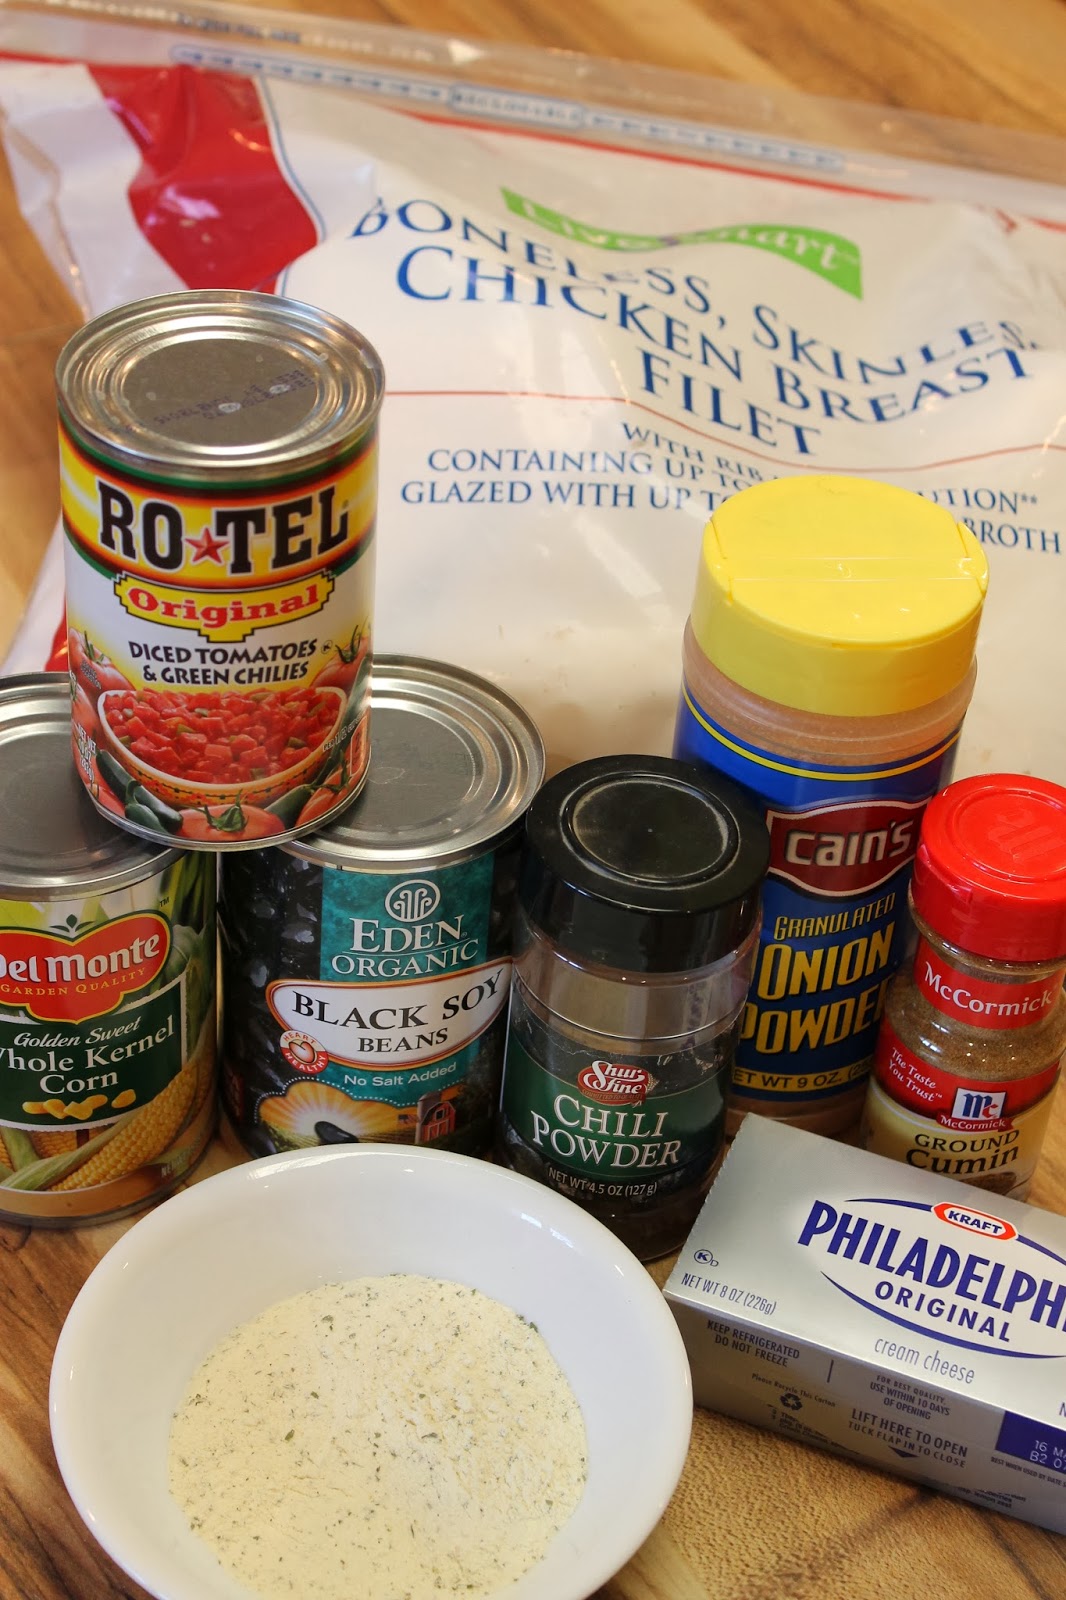

Start by placing your frozen chicken in the bottom of a greased crockpot.

Dump in your Rotel.

And then your corn.

Drain and rinse the beans. Toss those in!

Then add the Ranch dressing mix.

(And now my favorite part!) Add the cumin.
Inhale. Deep. Ahhh...

Then add the chili powder.

Lastly, dump in the onion powder and stir.


Drop on the cream cheese chunks. Cook on low for 6 - 8 hours or high for 3 - 4 hours. Right before serving, pull out the chicken breasts and shred them. Dump back in the juice and let sit for a few minutes.

Serve with some drop biscuits and enjoy!
Ashleigh

Cookies, cookies, cookies. I think that should be a song. I love my cookies! (Actually anybody's cookies) Back to my main point of this post. Chewy Oatmeal-Raisin Cookies.
You'll need:
2 cups flour
1 t. baking soda
1 t. baking powder
1 t. salt
1 cup butter, softened
1 cup sugar
1 cup brown sugar
2 eggs
2 t. vanilla
3 cups old-fashioned oats
1 1/2 cups raisins

Let's get started by mixing our flour, baking soda, baking powder, and salt. Set these aside.

Now mix the butter, sugars, eggs, and vanilla. Cream these really well!


Then mix in the flour mixture. Don't over-mix or you'll get a tough cookie.


Then dump in the oats and raisins. Gently fold in!

Drop onto greased cookie sheets and bake at 350* for 11-13 minutes. Pull out and let them sit on the sheet for about 2 minutes to finish cooking through.

Cool and store in air-tight containers.
Enjoy!
Ashleigh
2/3 cup butter, softened
2/3 cup brown sugar
2 eggs
1 1/2 cups flour
1 1/2 cups old fashioned oats
1 t. baking soda
1/2 t. salt
2/3 cup craisins
2/3 cup chocolate chips

Start by mixing the brown sugar and butter together.

Add eggs and mix really well…

In another bowl, mix oats, flour, baking soda, and salt.


Add (in four separate additions) the flour mixture to the butter/sugar mix.

Place in a tall glass the craisins and pour over them hot water, let sit for about 2 - 3 minutes, and then drain.

Dump in the chocolate chips. (Yummy!)

Then add the drained craisins (double yummy!)


Drop onto an ungreased cookie sheet and bake at 375* for 10 - 12 minutes. Pull out and cool.

Enjoy!
Ashleigh
Peanut butter cups are wonderful. But these make them even better being inside a little cookie!
1 3/4 cups flour
1/2 t. salt
1 t. baking soda
1/2 cup butter, softened
1/2 cup white sugar
1/2 cup peanut butter
1/2 cup brown sugar
1 egg
1 t. vanilla
2 T. milk
40 mini peanut butter cups

Unwrap all of the little peanut butter cups and set them on a layer of waxed paper.

In a bowl, sift together the flour, baking soda, and salt. Set aside.

In another bowl, cream the sugars, butter, and peanut butter together.


Beat in the egg, milk, and vanilla.

Add in the flour mixture.


Shape into little balls, then place them in a mini muffin pan, and bake at 375* for 10 minutes.

Pull out and right away start dropping peanut butter cups into them.

Don't push them in any. Just let them fall/melt.

Cool completely and store in an airtight container.
Enjoy!
Ashleigh
No-Chill Sugar Cookies
I love sugar cookies, but I can't stand having to wait for them to chill before cutting and baking them. That's where this recipe is a lifesaver! Make your dough, cut and frost your cookies, and you're done!
Cookies:
1 cup butter, softened
1 cup sugar
1 egg
1 t. vanilla
2 t. baking powder
3 cups flour
Icing:
1/2 cup butter, melted
2 T. vanilla
1/2 bag powdered sugar
Milk

First, cream your butter and sugar together.

Beat in the egg, vanilla, and baking powder.

Sift in the flour one cup at a time and mix between each addition.


Take half of the dough and roll it out on a layer of waxed paper.

Dip your cookie cutters in flour before using.


Place cookies on an ungreased cookie sheet. Bake at 375* for 5 minutes. Pull out, turn around, and bake for another 2 minutes.

It's always best to have some little helpers around!

Meanwhile, make your frosting. Melt butter and add vanilla.

Then add powdered sugar and milk. Don't get it too thin!


If you want, you can always divide it into bowls and use different colors. After your cookies have cooled, frost 'em!


Store in air-tight containers at room temperature.
Have fun!
Ashleigh
Making these cookies is almost a tradition for our Christmas get-togethers... Grandma always has a pile of these and her iced sugar cookies (to-die-for!!!) sitting in the kitchen! They're super easy to make and the icing is divine, but you might want to make a little extra (icing) as there never seems to be quite enough. Let's get to the good part!
Orange Cookies:
2/3 cup butter, softened
3/4 cup sugar
1 egg
1/2 t. soda
1/2 t. salt
1/2 cup orange juice
2 T. grated orange rind
2 cups flour
1/2 t. baking powder
Orange Butter Icing:
2 1/2 T. butter, softened
1 1/2 cup powdered sugar
1 1/2 T. orange juice
2 T. grated orange rind

Start by grating your orange peel. Set this aside.

Mix the soft butter, sugar, and egg together.


Stir in orange juice and rind. (I know it looks awful! Yes, that's supposed to happen..)

Mix in the flour, soda, salt, and baking powder.


Drop rounded dollops on an ungreased cookie sheet and bake at 400* for 8-10 minutes.

Meanwhile, let's make our frosting, shall we?
Mix the soft butter, juice, and rind together.


Add the powdered sugar and stir well!


Cool the cookies and then frost them. You won't want a lot of frosting on them, about a tablespoon or so.


Keep in an air-tight container and enjoy!
Ashleigh
Egg-in-the-Hole
I'm not sure why I'm posting this one… Maybe because it's easy. And quick. And tastes really good! (If you love eggs and such) I'm sure you don't need step-by-step instructions for it, but I'm gonna post em anyway! Have fun!
1 T. butter
1 slice bread
1 egg
salt
pepper

Use a glass and cut out a hole in the bread slice.

Fry the bread until it starts to get crispy. Yummy!

Crack your egg into the center and gently flip over after it cooks a bit on that side.

Enjoy!
Ashleigh
Chocolate Banana Swirl Bread
Yummy. Yummy. Yummy. Yep. That's all I can say when it comes to this bread! The mixture of chocolate and banana is perfect. Try it and find out...
You'll Need:
2 cups flour
3/4 t. baking soda
1/2 t. salt
1 cup sugar
1/4 cup butter, softened
1 1/2 cup mashed bananas (3-4 bananas)
2 eggs
1/3 cup plain yogurt or sour cream
1/2 cup chocolate chips, melted

Combine flour, baking soda, and salt. Set aside.

Cream together your butter and sugar.

Mash your bananas. (This is a good time to take out any lil bit of anger you've got pent up!)

Add the bananas, eggs, and yogurt to your butter/sugar mixture. Mix well!

Add in your flour and gently mix.


Melt your chocolate and then add 3/4 cup batter to the chocolate. Mix it well.

Layer the chocolate batter and regular batter in your bread pan and swirl with a knife. Bake at 350* for 1 hour and 15 minutes. Cool 10 minutes in the pan and then pop out and cool on a wire rack.

Store in the fridge and enjoy!!!
Ashleigh
Pumpkin Cream-Cheese Streusel Muffins
These muffins combine some of the most wonderful flavors! They're easy to make and you can whip 'em up in no time. Quick and impressive!
To make these little angels, you'll need:
Cream Cheese Filling:
4 oz. cream cheese, softened
1/2 cup powdered sugar
1 1/2 t. vanilla
Pecan Streusel:
1/2 cup flour
1/3 cup sugar
1/4 cups pecan, roughly chopped
1/2 t. cinnamon
3 T. butter, melted
Pumpkin Muffin:
1 1/2 cups flour
2 t. pumpkin pie spice
1/2 t. cinnamon
1/2 t. nutmeg
1/2 t. ground cloves
1/2 t. baking soda
1/2 t. salt
2 eggs
1 cup sugar
1 cup canned pumpkin
1/2 cup + 2 T. veggie oil
1/2 t. vanilla

First, make the filling by whipping together the cream cheese and powdered sugar until smooth. Add the vanilla and stir. Set this in the fridge until you need it.

In another bowl, make the streusel. Use a fork and combine the flour, sugar, pecans, and cinnamon.

Add your butter and stir.

Set this aside too!

In another bowl, whisk the flour, pumpkin pie spice, cinnamon, nutmeg, cloves, baking soda, and salt.


In yet another bowl, mix together the sugar, pumpkin, eggs, oil, and vanilla. Mix really well and then dump into the flour mixture.

Gently fold this together.

In a greased muffin tin, drop a small spoonful of batter.

Grab your cream-cheese filling and drop a dollop in too. Don't mix or stir this any!!!

Over the cream-cheese, spoon some more batter.

Top with some streusel. This is the yummy part. If you have any still left at this point!

Bake at 350* for 20 - 25 minutes or until golden. Pull out, let them sit in the pan for 5 minutes and then cool on a wire rack. Store in the fridge.
Enjoy!
Ashleigh
Bacon Wrapped Green Beans
Bacon is one of life's most wonderful little blessings. Add some brown sugar to it and it can make little kids love to eat one of their least favorite foods. Green beans. All the members of my family love green beans, but still, there are a few people out there that don't. So we make these little pork wrapped bundles and then even those people will eat them! (Watch them closely and you'll catch them going back for seconds.. and thirds...)
For a normal sized batch of these little babies, you'll need:
2 cans whole green beans, drained
1 lb. bacon, cut into thirds
Brown sugar
1/2 cup butter, melted

Take 4-5 beans and wrap the bacon tightly around them. Put in a large pan.

Sprinkle brown sugar over them.

Pour melted butter over them.

Bake at 350* for 45 minutes. Pull them out and drain off the fat and leftover butter (as you can see in the picture).
Bake for another 15 minutes or until golden brown and crispy.

Cool and keep in the fridge.
Enjoy!
Ashleigh
Most of the time when I make soup I like for it to be thick and creamy or chunky. But this one was actually really good for how simple and light it seemed! Check it out, try it, and let me know what you think.
You'll need:
1 clove garlic, minced
1 onion, chopped
1 celery rib, chopped
2 lbs. ground beef, browned
2 T. flour
3 cups canned chicken broth, divided
1 cup evaporated milk
8 ounces Velveeta, cubed
1/2 t. paprika
1/4 t. salt
1/8 t. pepper

Let's start with our skillet. I use cast iron because I love it... And with cast you can get a workout while your cooking (carrying it around and such). What other cookware can do that??

Toss in your onion, garlic, and celery.

And sauté. (Cook until tender) ( And I used two kinds of onion because I was running out.. Oops!)

Dump in a large crockpot.

Brown your hamburger and dump it in too.

Then in a small cup, combine the flour and 1/2 cup broth. Stir until lump-free. Dump this in the same skillet you browned hamburger in and add the remaining 2 1/2 cups broth.

Bring to a boil and then pour into the slow cooker.

Add the evaporated milk and stir.

Cube your cheese and toss it in too.

Add your seasonings, stir, and cook on low for two hours. If pressed for time you can always heat through on the stove.

Enjoy!
Ashleigh
These rolls are really easy, quick, and taste quite good! But be sure to not over mix them or they'll turn out just like hockey pucks. Yes, I'm sorry to say I know this tidbit from past experience... When that happens just crumble them and dry the crumbs. Use as you would normal bread crumbs or feed the birds with 'em!
You'll need:
2 t. yeast
1 cup flour
2/3 cup powdered milk
3 T. sugar
1 t. salt
2 1/2 T. butter
1 1/2 cups hot water
3 cups flour

Mix the first five ingredients in a large bowl.


Melt the butter.

Heat the water…

Stir the butter and water into the dry ingredients.

And then knead in the flour.

Don't over knead!!! Let the dough rise 10 minutes.

On a floured surface, roll out and cut the rolls…

Place on a greased cookie sheet. Let rise ten minutes more and bake at 400* for 10 minutes.

After baking, smear a little butter over the tops. When it comes to butter, I like to think you can never get too much!


Spread on a little jam and enjoy!!
Ashleigh
My mom has made this mac 'n cheese for years. Especially when some of us were sick. My favorite thing about this recipe is that you can whip it together (yes, does take a few minutes to cook the noodles, but it takes a bit of time to make anything. So why not take a bit longer and make it good???) and then toss it in the oven and forget it.
You'll need:
1 1/2 cups macaroni, cooked and drained
1/4 cup (1/2 stick) butter, cubed
1 lb. Velveeta, cubed
Salt
Pepper
3 cups milk
2 T. flour, sifted

Let's start by cooking and draining our macaroni.

While it's cooking, cube and toss your butter into a large roaster.

Do the same with your cheese.

Add some salt and pepper.

Dump in your macaroni…. Yummy!


Slosh in the milk.

Stir it around and sift the flour over the top. Stir that in too!
Bake in the oven at 350* for 45-60 minutes or until golden brown and crispy on the top.

Dish up and serve!

"I vant to suck yer blood!!! Bwahaha"
Soft Cocoa CookiesI just finished a batch of these and they taste great! The family loves 'em, they were super easy to make, and they look rather festive. Don't ya think?

You'll need:
1/2 cup (1 stick) butter
1 cup brown sugar, packed
1 egg
1/2 cup cocoa
1 1/2 cups flour
1/4 t. salt
3 t. baking powder
2/3 cup milk
1 t. vanilla
1/2 t. cinnamon

Start by mixing the butter and brown sugar.

Add your egg and mix really good!


In another large bowl, sift together all dry ingredients except cinnamon.


Add half of the flour mix to your butter/sugar. Gently stir together.

Add half of your milk to the bowl and stir together. Repeat this all over until all ingredients are mixed together.

Splash in the vanilla and cinnamon.


Drop by rounded teaspoons onto an un-greased cookie sheet.

Bake at 400* for 8-12 minutes. Don't overcook!

Cool on the pan 5 minutes and sprinkle with powdered sugar if you want too!
Have a great evening!
Ashleigh
Nutty Cheese Balls
You'll need:
1/4 cream cheese, softened
2 cups sharp Cheddar cheese, shredded
2 cups Monterey Jack cheese, shredded
3 T. mayonnaise
1/2 large red pepper, chopped
3/4 t. onion powder
1/8 t. garlic powder
1/8 t. salt
1/8 t. pepper
1 1/2 cups pecans, toasted and chopped

Start by toasting your pecans. Place on a cookie sheet and bake at 350* for 7-10 minutes.

Toss your cream cheese in the food processor until smooth.

Dump in your cheeses.

Dump in the mayonnaise.

Add your chopped peppers and seasonings.

Grind it up until it's well mixed and starts forming into a ball.

Scrap into a bowl and place in the fridge for 30 minutes.

Chop up your pecans and place in a bowl.

Form into 1-inch balls and roll in the pecans. Place on a cookie sheet lined with waxed paper.

Store in the fridge and enjoy!
Ashleigh
Cheese Bread-sticks
This is the final result of my recent bread-stick craze. These are super simple and they taste really good!
You'll need:
1 can Pillsbury classic pizza crust
1 t. Italian dressing
2 1/2 T. Italian dressing
Shredded mozzarella cheese
Shredded cheddar cheese

Preheat oven to 400*. Roll out your crust on a large pan.

Thinly spread the 1 t. dressing over the crust and bake for 9 minutes.

(This is after it's been baked.)

Now spread the 2 1/2 T. dressing over the baked crust.

Smother with shredded cheeses. Bake in the oven for around 12 -15 minutes on the top rack. Keep a close eye on it.

Pull out, cut into bread-sticks, and serve!
Enjoy,
Ashleigh
To make this wonderful cookie, you'll need:
6 cups flour
6 t. baking soda
1 1/2 t. salt
3 cups (6 sticks) butter, softened
3 cups sugar
2 cups brown sugar
3 t. vanilla
6 eggs
4 cups rolled oats
6 cups chocolate-chips

First off, mix the flour, baking soda, and salt in a large bowl.

Set aside.

Place your butter in a large bowl and let it soften. This is where a microwave is handy!

This is an awful picture. But I felt like I needed a before and after, so here it is.
Mix the butter, peanut butter, sugars, and vanilla well in a very large bowl.

Mix it until it looks like this!

In a separate bowl, beat your eggs and then add to your butter mixture. Mix it well too.

At this point, gradually add the flour to the butter mixture. Mix it...

And mix it...

And mix it... Until it looks like this!

Add in your oats and mix it some more.

Then add the chocolate chips. Gently mix these in too.


Preheat your oven to 350* and drop your cookies onto an ungreased cookie sheet. Bake for 10 minutes and then turn them around and bake for 5 minutes. Pull out of the oven and let sit on the pan for 5 minutes before placing on a rack.

Enjoy them and have a great evening!!!
Ashleigh
LumberJack Skillet
I made this for supper tonight and it turned out great! Now, I don't have a recipe for it, but I can tell/show you how I made it. Good luck and have fun!
You'll need:
2 lb. sausage, cut in chunks (see picture)
1 t. liquid smoke
1 large onion, sliced
1 red pepper, sliced
1 green pepper, sliced
10 cups potatoes, 1-inch cubes
1 T. liquid smoke
3/4 cup water
3 cups frozen corn
Freshly cracked black pepper

Start by thawing your sausage just enough that you can cut it. If you thaw it too much, it will get soft and squishy, then you won't be able to cut it. Slice and put in a large dutch oven on medium-high flame.

Using a slotted spoon, place the sausage in a bowl when it's almost cooked through (it can still have a bit of pink in it).

As you can see here, I didn't have any peppers that were good. So I went with all onions and it still tasted good! Dump your onions and peppers in the dutch oven and drop in a pat of butter. There still is some grease from the sausage, but not quite enough.

Cook the onions until the edges start burning some and then crack some black pepper over them. Pull them out and place in a bowl as well.

Wash and chop your 10 cups of potatoes.

Add them to the pot. Mix your water and 1 T. liquid smoke and pour that over them. Cover and let sit on low flame until they become a bit more tender (still, don't cook them through.)

Add the butter and melt it.

Then dump everything back into the dutch oven and mix together gently.

Dump in your corn and mix it in too. Let cook over low flame until potatoes are tender (sausage should be fully cooked by then).

Now dish up and serve with warm Dulce De Leche brownies. People will love you. Yes, I'm serious.
Enjoy them and have a great evening!!
Ashleigh
Homemade BBQ Rub
This recipe is super short, sweet (okay, not so sweet, but I had to add that part!), and to the point. It makes a great rub for any steaks or meat that you want to have a nice BBQ flavor, and for an added smokey flavor, add some liquid smoke to your meat. Makes around 3/4 cup.
You'll need:
3 T. onion powder
3 T. garlic powder
2 T. dried parsley
2 T. celery salt
2 T. dry mustard
1 T. pepper

Place all ingredients in a bowl and mix well.

Store in an air-tight container.
Enjoy! Ashleigh
Homemade Taco SeasoningWe're done buying taco seasoning! This mix is super easy to make and it tastes the same. One batch is enough seasoning for one pound of meat, so I like to make at least a triple batch and then store it in a sealed container.
You'll need:
1 T. flour
2 t. chili powder
1 1/2 t. dried, minced onion
1 1/4 t. salt
1 t. paprika
3/4 t. crushed beef or chicken bouillon cube
1/4 t. white sugar
1/4 t. cayenne pepper
2 t. cumin
1/4 t. garlic powder
1 dash onion powder

Place all ingredients in a large bowl and admire the pretty colors. This is a MUST before you stir it.

When you're done admiring, mix it all well. Store in an air-tight container.

Taco Salad
Ashleigh
Southern-Style Cowboy Beans
If there's one thing that I've learned since I started cooking, it's that guys like meat. Lots of it. I mean lots and lots of meat. And they aren't even picky! Chicken, beef, deer, pork, whatever. Just so long as something died to feed them (too harsh? I wondered.) Sometimes the guys will just brown a pound of hamburger and eat it plain. Me? I need spices and ketchup, but I'm a gal. That's normal, right?
Anyway, last night, I made what I thought was a pretty big batch of beans, a very male-friendly meal! Funny thing is, we ate almost all of them at one sitting… Of course it helps that we had a couple friends over. But still, that was a lot of beans!
You'll need:
1 lb. bacon
1 T. brown sugar
1 t. liquid smoke
2 lbs. hamburger (I used deer and beef), browned
1 onion, chopped
1 green or red pepper, chopped
6 (15 ounce) cans pork n beans
3/4 cup BBQ sauce
1/2 cup brown sugar
1/4 cup apple cider vinegar
2 T. Dijon mustard

First, cut your bacon into pieces, dump in a large dutch oven, and start frying on medium-high heat.

Fry it until the edges start getting brown, and it curls. It isn't thoroughly cooked, but you'll finish that later.

Once the bacon's curled, add in the 1 T. brown sugar.

And the 1 t. liquid smoke.

Stir this in well, then put the lid on and let it simmer on medium-high heat for around 2-3 minutes.

Meanwhile, chop your onions and pepper.

Check up on your bacon. If it looks about like this (don't cook it all the way yet) then you can shut off the flame and...

Put it all in a bowl using a slotted spoon. Leave the drippings in here, you really need those babies!

I know it isn't all the way done yet, but it tastes wonderful at this point! As my family could probably tell you..

Okay, now toss your pepper and onion in the drippings and sauté.
 After a couple of minutes they should look like this.
 Then add all of the other ingredients…


 And mix together.
Sprinkle the bacon on top.

Although your kitchen probably started smelling wonderful earlier when you were frying the bacon, it will smell even better now with the bean/bacon/vinegar smell. Trust me.
Now, let it all simmer for 2 hours. Stir (yes, I'm sorry, but you'll have to stir that beautiful bacon in!) every 20 minutes so that the bottom doesn't burn (or at least not too bad).
Now, let it all simmer for 2 hours. Stir (yes, I'm sorry, but you'll have to stir that beautiful bacon in!) every 20 minutes so that the bottom doesn't burn (or at least not too bad).

This picture doesn't do it justice at all.
But anyway, that's it! You're done!! Yes, you now have my permission to taste it.
Everyone seemed to like it last night, so hopefully you do too!
Ashleigh
Oatmeal BreadThis bread is really yummy and since you can just toss it in the bread machine for a few hours and forget it, it's also one of my favorites.
You'll need:
1 cup rolled oats
2 cups flour
1 cup whole wheat flour
2 t. yeast
1 1/4 t. salt
1 1/2 cups warm milk
2 T. honey
2 T. veggie oil

Toss your oats into the bread machine pan/bowl/thingie.

Then your flour..

Then your whole wheat flour.

Make a small hole in your flour pile and pour your yeast into it.

Then add your salt.

And then your warm milk, be sure to pour it around the yeast hole.

Then your honey...

And then your oil. Put this all in the bread machine and bake on the whole wheat setting.


Spread a little jelly on and you're done!
Ashleigh
Dulce De Leche Brownies
The Pioneer Woman's latest cookbook is finally out!! Being the crazy person I am, I've been dying to make something out of it since I got it a couple of days ago and so last night I did! I made the Dulce De Leche Brownies (with complications) and they turned out beautifully! Here's a run down of my adventure in the kitchen..

- I found I had no canned Dulce De Leche.
- So, I had to make my own.
- I learned that sweetened condensed milk really CAN blow-up in the microwave.
- I promised myself I'd never cook again if I made it through this alive. (But I lied...)
- I found out AFTER I'd already started everything, that I had no unsweetened baker's chocolate... I wonder why?!?!
- So, I had to substitute.. Who knew you could burn cocoa???
- I then spilled cocoa everywhere....
- And I'm blaming part of it on my five-year-old helper. While it was sweet having him "help" me, it also notched up my blood pressure and caused me a bit of stress when he's standing on a chair by the stove with a devilish grin on his face holding a spatula (that I was still using) and licking off the chocolate. Not that that's unusual.
- In conclusion, we had fun, there is still caramel in various notches and crevices in the kitchen, and we are still cleaning chocolate out of various notches and crevices of the the five-year-old. But we had fun. At least he did. That's all that matters, right??
So let's get started...
You'll need:
Five 1-ounce squares unsweetened (baker's) chocolate
1 cup (2 sticks) butter, softened
2 cups sugar
4 eggs
1 1/4 cups flour
1 T. vanilla
Half a 14-ounce can Dulce De Leche (or my substitute)

Now, IF you happen to find that you have no Dulce De Leche on hand (I wouldn't know why?!?!), than you can easily make a substitute. Start by pouring a can of sweetened condensed milk into a microwave safe bowl. Place in the microwave at 50% power for 4 minutes. Stir every minute or so.

It's gonna blow!!!! Keep a good eye on it or what happened to me will happen to you! (It blew up... Everywhere... It was awful..) After microwaving it for 4 minutes at 50% power, kick it down to 30% power for 8-12 minutes. Stir often.

Soon it will have reduced in amount and turned to caramel.. Wonderfully sticky!

Melt your baker's chocolate, or if you have none, melt one stick of butter and mix in 15 T. of cocoa. If you have to microwave it anymore after adding the cocoa, please be careful!!! If it burns, it smells horrid (yes, I know from past experience.. No details..).

Mix until fluffy, your sugar and butter.

Add eggs one at a time, mixing well in between each.

Yummy!

Now add your chocolate..

Mix chocolate in well and then add your flour.

Mix it well too.

Add the vanilla.

Mix it.

Spread in a greased 8x8 or 8x10-inch pan...

Drop on dollops of the Dulce De Leche or your substitute.

And swirl with a knife... This is the fun part!
Bake at 325* for 45-60 minutes.

Let the brownies cool in pan for 15 minutes and then turn out, cut, and enjoy!!
Ashleigh
Peanut-Butter Eggs
I've always loved peanut butter eggs, but I love 'em even more now that I don't have to wait until Easter to buy them, and the fact that you get a whole lot more bang-for-yer-buck with this recipe!
To get started you'll need:
1 cup creamy peanut butter
3/4 cup melted butter
2 cups powdered sugar
1 1/2 cups Graham Cracker (fine) crumbs
3 cups chocolate chips

Start by putting your peanut butter in a large bowl.

Mix in your melted butter.

Add powdered sugar and don't get alarmed if it looks dry, it'll all work out!

Then mix in your Graham Cracker crumbs.

Stir together really, really well.

Using a large serving spoon, shape the mix into an egg.

Place on a large cookie sheet, covered in waxed paper, and freeze for 30 minutes.

Meanwhile, start melting your chocolate. Pull out the eggs and dip in the chocolate...

Place on a wire baking rack and then put in the freezer for 15 minutes.

Take out of freezer, store in airtight container in fridge, and enjoy!!
Ashleigh
Fresh, frozen chives? I know what you're thinking... Yuck. That's what I was thinking until I couldn't find any more regular chives in the pantry and decided to go cut the few chives we had left in the herb garden. And you know what? I'd rather use these than the dried stuff any day!

Start by cutting you chives off about two inches about the base of the plant, and then sort the out the dead stuff.

Once they're all cleaned up, gently rinse them with cold water and let them air dry.

Chop them finely.

And measure a tablespoon into each pocket on an ice cube tray. Fill with water and then freeze.

Once frozen, you can either leave in the tray or place cubes in a bag and keep in the freezer. Now just grab a tablespoon of fresh chives when you need it!
Ashleigh
Cheesecake ShootersThese babies are so incredibly easy, incredibly quick, incredibly wonderful, in-... you get the point! You can make a "Cherry-Whiskey Topping" (I've added the link for the recipe from the Pioneer Woman), but since I didn't have any whiskey on hand I just made the regular (non-alcoholic!) version. Have fun!

For these little angels, you'll need:
12 (whole) Graham Crackers
2 (8 ounce) Bricks Cream Cheese
1 can Sweetened Condensed Milk
1 can Cherry Pie Filling
Slivered Almonds
You can use either your knuckles or a rolling pin to crush the Graham crackers in a large plastic bag. If you have any rage, now would be a good time to work it out without hurting anyone!

Spoon around 2-3 T. into your goblets. If you would like for the crumbs to be a bit moister, just add 2 T. of melted butter to them in the bag.

Then using a large electric mixer with a whisk attachment, whip together the cream cheese and milk until fluffy like this! It should take 2-3 minutes.

Spoon it into the goblets on top of the crumbs..

Then spoon on the cherry pie filling (you can use any pie filling you like!).

Top with slivered almonds and chill.

These taste amazing!
And for the whiskey-cherry topping, here's the link: http://thepioneerwoman.com/cooking/2013/07/cherry-cheesecake-shooters/
Enjoy, Ashleigh.
And for the whiskey-cherry topping, here's the link: http://thepioneerwoman.com/cooking/2013/07/cherry-cheesecake-shooters/
Enjoy, Ashleigh.
Banana Chocolate-Chip Muffins
Because of how delicious these muffins are and how many my family can eat in an evening, I made a double batch (as you can see in the pictures). They can be made in less than half an hour (bake time included!)
You'll need:
1 1/4 cups mashed bananas (about 3 bananas)
3 T. veggie oil
1 egg
2 cups Bisquick
1/3 cup sugar
1 cup chocolate chips

Peel your bananas and toss them in a bowl.

Mash 'em till they look something like this.

Dump in your veggie oil.

And then your egg. If you do make a double batch (like I did), goose eggs can be quite handy as one goose egg equals 2-3 chicken eggs!

Mix it all together well.

Then in a separate bowl, toss in the flour...

And then the sugar...

And mix well!

Dump flour mixture into the wet stuff. Dump in half, mix, and then dump in the other half of the flour stuff and mix.

Don't over stir!

Mix in chocolate chips... mmm... yummy!

Drop into greased muffin tin, and bake at 400* for 15-20 minutes.

Pop 'em out and enjoy! 3 is the limit. Trust me. Anymore and you'll feel awful... I know from past experiences (notice the (s), I don't make the same mistake twice. I make it three or four times just to be sure!!!) Enjoy! Ashleigh
Beer Bread
Although this bread is called "Beer Bread", you don't need beer to make it. Any carbonated beverage works just fine. I like to use Sprite, as it doesn't seem to add all the sweetness that beer does. But in other variations of this recipe, beer does taste better than Sprite. So you'll want to experiment a bit! Enjoy!
For one large loaf you'll need:
2 cups flour
1 cup whole wheat flour
2 t. active dry yeast
2 T. sugar
1 1/4 t. salt
1 1/4 T. veggie oil
1 can beer or any other carbonated beverage, flat or fresh

Dump flour into bread pan.


Then make a hole in the top of the flour pile, and put the yeast in the hole.

Then add on your salt.

Then dump in your sugar..

Then pour in your veggie oil, avoid the pile of sugar, salt, and yeast. Kinda dump around the outer edge. Add your pop or beer and place in bread machine. Set it on medium temperature and use the whole wheat setting.

Yummy! Now it's done and you really, really need to test it before it cools... Really. You do. Toss on some butter and enjoy!
Cheese Dip
I love this cheese dip. It's very similar to that of Carlos O Kelly's, but with a little more Rotel, and a little less garlic and cheese.
2 T. butter
1 lb. Velveeta
10 oz. sour cream
2 cans Rotel
3/4 t. garlic powder
1/2 t. salt
~ Place all ingredients in a small crock-pot or saucepan on low heat, melt, and combine. Be sure to stir often and don't burn.
~ Eat with chips and salsa, and enjoy!
Salsa recipe can be found here - http://prairiegalcookin.blogspot.com/2013/08/salsa.html
Texas Brownies
These brownies are moist and delicious! Pull them out of the oven and pour the frosting right onto them, none of this "waitin-till-they-cool" stuff! :)
For the brownies you'll need:
2 cups flour
2 cups sugar
1/2 cup butter (1 stick)
1/2 cup shortening
1 cup strong coffee (or water)
1/4 cup dark, unsweetened cocoa
1/2 cup buttermilk
2 eggs
1 t. baking soda
1 t. vanilla
And for the frosting:
1/2 cup butter (1 stick)
2 T. dark cocoa
1/4 cup milk (plus a lil' extra for later)
3 1/2 cups unsifted powdered sugar
1 t. vanilla

To start, butter a 17 1/2 -by- 11 inch jelly roll pan. Be sure to get the edges well!

Mix the flour and sugar well in a large bowl.

Then in a large saucepan, melt the butter and shortening together.

Then in a large saucepan, melt the butter and shortening together.
 Once it's all melted and blended, stir in coffee and cocoa.
Bring to a boil.

Pour the boiling mixture into the flour/sugar bowl.

Stir until well combined.

Add in 2 regular eggs, or like in my case, one goose egg. (Huge, huh?)

Then add your buttermilk. If you don't have buttermilk on hand, you can easily make some by mixing 1/2 cup milk with 2 t. lemon juice or vinegar. I like to make it right when I need it, because it seems to get clumpy when left to sit for awhile. Stir it well and dump it in!

Then add your baking soda and vanilla. Mix together well.

Pour into your greased pan and spread out to the edges evenly.

Bake at 400* for 20 minutes.
And don't worry, you aren't done yet! Those dishes will have to wait till after you've made the frosting... I'm sorry, I know how you're dying to get to them... ;)
And don't worry, you aren't done yet! Those dishes will have to wait till after you've made the frosting... I'm sorry, I know how you're dying to get to them... ;)

In the same pan you used earlier, melt a stick of butter.


Whisk in milk and cocoa, and bring it all to a boil.

Add powdered sugar, do not panic, it will all stir together. Keep the burner on low and start stirrin.

Keep stirrin...

And soon it'll look like this! Add 1 T. more milk and slowly stir. At this point the frosting may seem fine, but when it sets up, it'll get hard if you don't add the extra milk.

Dump in the vanilla. The brownies should be about done by now.

Check the brownies with a toothpick. If it comes out clean (like this) they're done. If it has batter on it, put them back in for a bit. Keep your eye on them so they don't burn.

Pour the frosting on the brownies and carefully spread. Let it cool and eat up!
Pulled Pork
I love, love, love this pork... I got the recipe from Ree Drummond, but I've changed it a tiny bit! It is spicy, but it's really, really good.
You'll need:
1 large onion
4 - 5 lb. whole pork shoulder or butt roast
1 can (7 ounces) Chipotle Peppers in Adobo Sauce
2 cans Dr. Pepper
2 T. Brown Sugar
Salt and pepper

Cut onion into eighths and place in bottom of crock-pot, and then pot roast on top.

Pour peppers over roast, DO NOT taste these!!!!

Crack open the hard stuff..

Pour in one can of Dr. Pepper.

Then place brown sugar, salt, and pepper on top of roast.

Pour in second can of Dr. Pepper, place on lid and cook overnight on low.

This is fall-apart-in-your-mouth wonderful! The taste is incredible. Enjoy!
Summer Sausage - Phase 2
Here's phase 2 for our Summer Sausage... Trust me, all the work will be worth it in the end!

Take your sausage out of fridge (now that its been in the fridge for 24 hours), unwrap it, and place it on a broiler rack.

If using all beef for it, cook it a 300* for 45 minutes on one side, pull it out and turn the rolls over, and then cook for 15 minutes on the other side. But if you did like I did and are using beef and venison, cook at 300* for 45 minutes, pull out and turn the rolls, and then cook for at least another 45 minutes on the other side.

While it's cooking on the one side, you have plenty of time to take a short walk...
'

And then flip it over, and go take care of your chores! For us, 45 minutes is usually about the time it takes to do all the chores.. Or at least most of 'em! Time to head back in and get the sausage!

Yummy!!! Now, you can either stuff yourself and eat all 12-15 rolls, or you can let them cool, rewrap them in foil, and place in the freezer! Enjoy!
Summer Sausage - Phase 1
For my family, having summer sausage in the freezer is almost as important as having canned green beans and tomatoes in the pantry. So I usually make a very large batch of this and then re-wrap it after cooking, before freezing. Like I said, this is a mammoth batch, so if you want to cut it down (it's been tripled) that's fine!
To get started:
6 pounds of ground meat (I use 3 lbs. beef and 3 lbs. deer)
1 1/2 cups water
6 T. Morton Tender Quick salt
4 1/2 t. liquid smoke
3 t. garlic salt
1 1/2 t. onion salt
1 1/2 t. pepper

Mix ground meats well, in large bowl. Then, add salt, seasonings, and liquid smoke.

Pour on water...

Keep pouring...

Mix VERY well, it'll end up kinda sticky.. Like this.

Then pull out about 12-15 sheets of foil.

Plop these little babies on the foil and then wrap 'em up!

Place on a tray and put in the fridge for 24 hours.
I'll post phase 2 tomorrow! :)
M&M Oatmeal Cookies
I love cooking, but I can't lie... It hurts... My arms and my back and my toes and my wrist and my- you get the picture.
Now, this is a recipe from my great-grandma (thanks, again!) that I have modified a bit. She had six hard-working boys and a husband, therefore she cooked in very large quantities! It makes around 10 dozen cookies, and you can just dump them into a bucket and toss them in the freezer, trust me, they taste good right out of there too! Originally, it was meant to be a Chocolate Chip Cookie recipe, but since I had already posted one of those, and I had a ton (really, almost a ton) of M&M's, I tweaked it a bit! Hope you enjoy them!

To get started, you'll need:
3 cups butter
3 cups brown sugar
1 2/3 cups white sugar
6 large eggs
1/2 cup water
1 T. vanilla
6 cups sifted flour
2 t. baking soda
1 1/2 t. salt
6 cups oatmeal
3 cups M&M's or chocolate chips

First, dump your brown sugar into a VERY large bowl.

Then add your white sugar.

And then your butter, all three cups worth... Cream this together. Then add your eggs, water, and vanilla. Mix really well!

Now, sift in your flour. Mentally prepare yourself for the workout to follow.

Start mixing....

And mixing... Until it looks like this!

Now be sure to SIFT in the baking soda and salt, as baking soda, when not sifted, can clump together and form bitter little pockets in your food. Absolutely nasty!

Now, you've made it through mixing six cups of flour, lets try six cups of oatmeal, shall we?

Yay! You made it! How are your arms and wrists feeling?? Sore? Just wait, we're almost done!

Now you can dump in the three cups of M&M's... mmm.. Yummy!

Then plop these little babies onto a cookie sheet and bake at 350* for 15 minutes, then pull them out, turn them around, and bake for another 2 minutes.

Cool before removing from pan. Enjoy!
Great-Grandpa's Molasses Cookies
Today, I'm posting a yummy recipe that is large enough to feed an army and tasty enough it won't last in your house long. It was one of my great-grandpa's favorite cookies, and now it's one of mine as well!

Here's what you'll need:
3 cups shortening
4 cups brown sugar
4 eggs
1 cup molasses
1 cup sifted flour
2 t. soda
1 t. salt
1 t. cloves
2 t. ginger
4 t. cinnamon
7 cups sifted flour
~ Mix the first four ingredients well in a large bowl.
~ Comine the next six ingredients with the creamed mixture.
~ Stir in the 7 cups of flour and bake at 350* for 8-10 minutes. DO NOT OVER COOK!! If you do these will be true jaw breakers!!
Enjoy!
Peanut Blossoms
These are peanut-blossoms, the recipe came from my grandma (thanks!). They're kinda like a peanut -butter sugar cookie with a chocolate kiss on top, needless to say they are divine! You'll make them and find yourself snarfing them down by the handful!

1 t. baking soda
1/2 cup butter
1/2 cup peanut butter
1/2 cup sugar
1/2 cup brown sugar
1 egg 1 t. vanilla
LOTS of chocolate kisses
Cream sugars, butter, vanilla and add remaining ingredients (except choc. kisses) Mix well, form in small balls and roll in white sugar. Place on an ungreased cookie sheet and flatten a little bit. Bake at 375* for 8 minutes watching closely. Pace a kiss on top and bake for 3 to 5 minutes more. Take out and cool. Enjoy!
Pumpkin Swirl Bread
Fall, one of the most wonderful times of the year. Thanksgiving turkeys and beautiful leaves. Cool days and warm bread. It's even better when your house is full of warm, delicious smells.
Which is one reason I'm posting this recipe today, it's your moist, yummy pumpkin bread with a twist... Cream cheese!
Filling:
1/2 cup sour cream
2 T. sugar
2 oz. cream cheese
1 egg
Bread:
2 1/2 cups flour
2 t. baking soda
2 t. cinnamon
1 t. ginger
1/2 t. cloves
1/2 t. salt
2 cups sugar
1 cup butter, melted
2/3 cup water
2 cups canned pumpkin
4 eggs
~ Preheat oven to 350*. Spray two 9"x 5" loaf pans with non-stick cooking spray.
~ Combine ingredients for filling in small bowl, mix well and set aside
~ In a large bowl, mix the flour, baking soda, cinnamon, ginger, cloves, and salt.
~ Add to the flour mixture sugar, butter, water, pumpkin and eggs. Mix well.
~ Pour 1/4 of the batter into a loaf pan, spread 1/2 of the cream cheese mixture over it, and then pour another 1/4 of the batter over the cream cheese mixture. Do this to the other pan as well.
~ Bake for 1 hour, or until a toothpick comes out clean when inserted in bread. Cool for 30 min and remove from pan. Let cool completely before cutting. Enjoy!
Salsa
This salsa is wonderful! Depending on how you like to season and pulse yours, it can be spicy or mild, chunky or thin. No matter how you do it, it's amazing every time!
One word of caution, the seeds in a jalapeño are what holds the heat, so if you like less spicy salsa you can take them out. I prefer to leave mine in, but it's up to you!
Here's what you'll need:
1 (28-ounce) can Whole Tomatoes with Juice
1 (8-ounce) can Rotel Original (Diced Tomatoes and Green Chilies)
1 (8-ounce) can Rotel Mexican ( Diced Tomatoes and Green Chilies with Cilantro and Lime)
1/2 cup chopped onion
1 garlic clove, minced
1 jalapeno, thinly sliced
1/4 t. cumin
1/4 t. salt
1/2 cup cilantro, chopped
Juice of 1/2 a lime

Start by dumping in the whole tomatoes, go ahead, slosh 'em in. I'll wait...

Then dump in your two kinds of Rotel... Ahh, I love this smell!

Your chopped onion.

Now, the garlic clove...

Then add your jalapeño.

Your salt.

Then the cumin... This is one of the most wonderful smells on earth... no universe... no-.. never mind. You get the point!

And last but not least, the lime juice and cilantro. I think the fresh squeezed lime juice tastes much better than the store bought stuff! But if you don't have a lime, the other should work too. I'd just add a little extra! Pulse this a few times or until it reaches your desired consistency.

And you are done! This is best after refrigerated overnight, but it can be eaten right after making. Enjoy!
No comments:
Post a Comment
Feel free to leave a comment as I love hearing from you guys! Please type nice, no rudeness or foul language, and no links.
Thanks!
Ashleigh